Disney Theatrical Productions to Present “Broadway and Beyond” at D23 Expo 2013

D23: The Official Disney Fan Club is thrilled to announce a special theatrical performance, “Broadway and Beyond,” which will appear at D23 Expo 2013. Thomas Schumacher, president and producer, Disney Theatrical Productions, will host this musical journey into Disney’s history on Broadway and beyond. The star-studded event will feature an all-star lineup, including Heidi Blickenstaff (The Little Mermaid), Ashley Brown (Mary Poppins and Beauty and the Beast), Merle Dandridge (Tarzan and Aida), Josh Strickland (Tarzan) and Alton Fitzgerald White (The Lion King). They will sing beloved songs from the award-winning musicals they starred in as well as classic tunes from the Disney on Broadway catalogue.

The one-night-only performance will take place on Friday, August 9, at 6:30 p.m. on Stage 23.

For more information on D23 Expo 2013, visit D23Expo.com.

The Making of a Mickey Mouse Doll In 1930s Style

As the popularity of Mickey Mouse began to soar in the early 1930s, Walt and Roy were confronted with the challenge of meeting the explosive demand for engaging consumer products, while sustaining the creative integrity and consistent quality of their character merchandise. The first merchandise contract was signed in February 1930, granting Geo. Borgfeldt & Co. the responsibility to manage the licensing of Disney product to manufacturers in the U.S. and abroad. One of the items that Walt and Roy were most focused on was the production of a Mickey Mouse stuffed doll.

walt-files-mickey-mouse-doll-feat-4

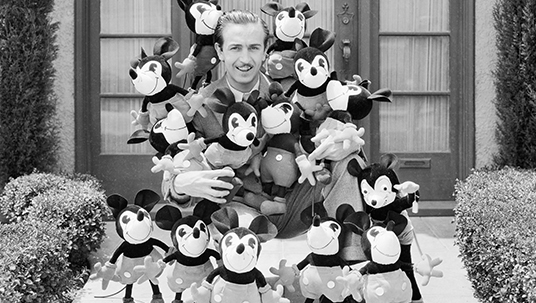
A successful example of a Mickey Mouse doll had already been created by an enterprising seamstress in Los Angeles, Charlotte Clark (née Carolyn Geis), who in January 1930 had asked her then 16-year-old nephew and aspiring young artist, Bob Clampett, to come up with sketches of Mickey Mouse on which she could base her doll design. Not having any reference material handy, Bob grabbed his sketch pad and went to the Alexander Theater in Glendale, California, to sketch Mickey in action from one of the Mickey Mouse cartoon shorts being screened there. Charlotte and Bob created the first doll, and on the advice of Bob’s father, sought the approval from Walt and Roy to produce and sell their Mickey Mouse doll creations. Not only were the Disney brothers pleased with Charlotte Clark’s doll, they set it as the standard against which all subsequent Mickey Mouse dolls were soon to be measured.

walt-files-mickey-mouse-doll-feat-1

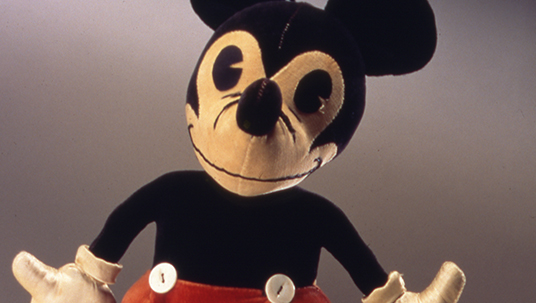
While Charlotte Clark’s Mickey Mouse dolls provided the exemplar model of product quality and character likeness that satisfied Walt and Roy/s high expectations, there were limits to the quantity that could be produced by Clark and the small team assembled to create the dolls. By November 1930, production reached three to four hundred dolls per week at the “Doll House,” the small rented house Walt set up near the studio for the exclusive production of these handmade Mickey Mouse dolls, which originally were given out to business acquaintances, select studio visitors, and family friends.

walt-files-mickey-mouse-doll-feat-2

To better meet the demand for Mickey Mouse dolls, George Borgfeldt, following the arrangements stipulated in his licensing agreement, was instructed to identify a manufacturer who could create dolls at an increased rate but maintain the specific quality and design of those being produced by Charlotte Clark. This task proved to be far more challenging than expected, with more than a year spent in creating multiple sample dolls followed by pointed correspondence from Roy Disney who, with Walt, was adamant in expressing concern over any deviation from the integrity of the doll they required.

060613_D23MembersOnly_FromTheArchives_mc-calls-feat-2

Early in 1931, Clark was also producing a Minnie Mouse doll, which Borgfeldt was asked to include in his efforts to manufacture a line of Mickey dolls. By October 1931, however, Walt and Roy were still disappointed in the examples provided by Borgfeldt but were limited by their licensing agreement with him from engaging in other production contracts. Driven by their priority to meet the demand for Mickey and Minnie dolls that sustained the character design they required, while adhering to the stipulations of their licensing agreement, Walt and Roy decided to take a different production path entirely. In partnership with the McCall Company of New York City, they chose to provide the opportunity for the public to construct their own dolls, utilizing the same design and method as those of Clark and her Doll House team.

060613_D23MembersOnly_FromTheArchives_mc-calls-feat-3

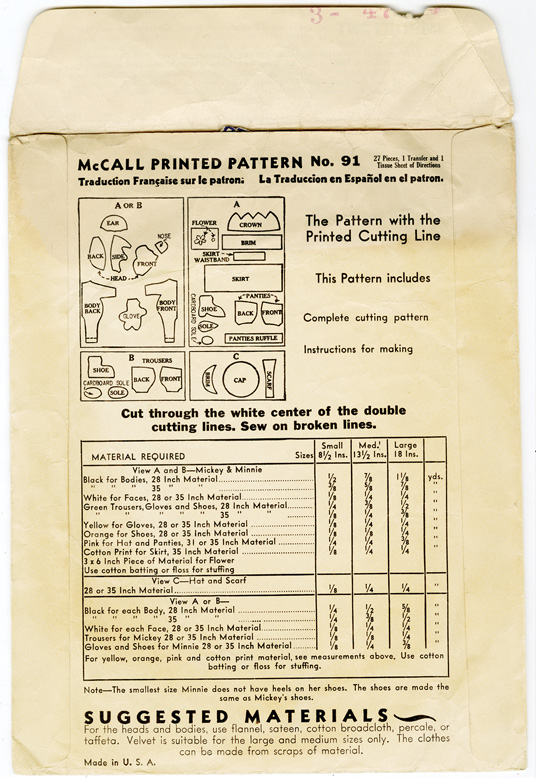
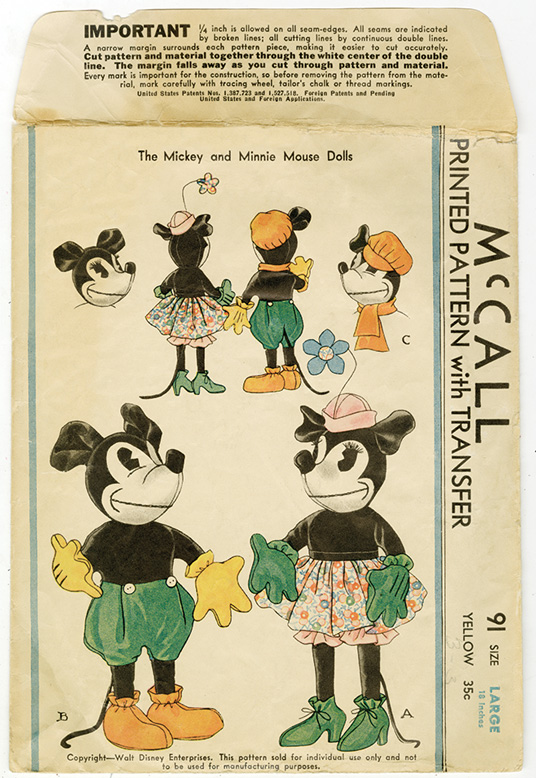
In 1932, McCall Printed Pattern No. 91, for producing a pair of Mickey and Minnie Mouse dolls, was issued at a cost of 35 cents, in one of three different sizes of dolls: small (8½ inches), medium (13½ inches), and large (18 inches). The pattern envelope contained a tissue-cutting pattern for the 27 pieces required to assemble one Mickey and one Minnie doll, complete sewing instructions, a hot-iron transfer for stitching facial details, and a list of required materials and color suggestions for each element. The front of the envelope shows a full-color illustration for each doll, front and back, with Mickey sporting a pair of jaunty green trousers, a reference perhaps, to the wardrobe he donned for his first color animated appearance in the 1932 short film, Parade of the Award Nominees produced for a screening at the Academy Awards® Banquet that same year. Also printed across the bottom of the pattern envelope are the specifications that “This pattern sold for individual use only and not to be used for manufacturing purposes,” emphasizing the distinction of the pattern’s home-sewing, consumer-focused usage.

060613_D23MembersOnly_FromTheArchives_mc-calls-feat-1

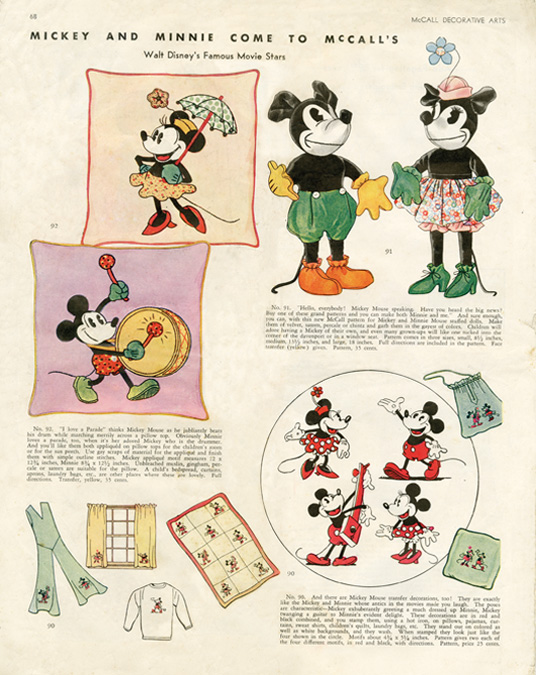
In addition to encouraging consumers to stitch their own dolls, McCall’s promoted Mickey and Minnie appliqués that could be used to decorate pillows, curtains, aprons, children’s bedspreads, and other home accessories. There were also Mickey and Minnie iron-on transfers, in characteristic poses inspired by their films, suitable for adorning pajamas, sweat shirts, quilts, and laundry bags, according to an advertisement welcoming “Walt Disney’s Famous Movie Stars” in the Summer 1933 issue of McCall Decorative Arts magazine.

The McCall Pattern No. 91 was available from 1932 through 1939, resulting in thousands of treasured and now highly collectible Mickey and Minnie dolls. By 1934, after George Borgfeldt’s contract agreement had expired and the inimitable Kay Kamen was helming the company’s licensing business, Walt and Roy were able to arrange for the Knickerbocker Toy Company to manufacture Mickey and Minnie stuffed dolls, also designed by Charlotte Clark. Later, in 1947, dolls were made by the Gund Manufacturing Company, where Clark continued to oversee the dolls’ designs until her retirement in 1958. As a result of Walt and Roy’s commitment to the creative integrity of their characters and product, the Mickey and Minnie dolls from Charlotte Clark’s designs are still some of the most highly prized Disney collectibles of all time.

By Libby Spatz, Archivist and Librarian, Disney Consumer Products

Unwrapping Mickey’s Birthdayland at Magic Kingdom

Opened on June 18, 1988, as part of a yearlong celebration of Mickey Mouse’s 60th birthday, Mickey’s Birthdayland was meant to be a temporary land that occupied the approximate three-acre space adjacent to Fantasyland that’s currently part of Storybook Circus in New Fantasyland at Magic Kingdom Park.

For a generation of twenty and thirty-somethings (and their families), simply mentioning this area will bring back fond memories of meeting Mickey Mouse for the first time, pastel colored Duckburg-themed building facades, and Minnie Moo the cow. There was something for everyone to enjoy in this colorfully simple land tucked away in the back of Magic Kingdom Park. Its success at entertaining and pleasing guests would spur the area to be re-themed as Mickey’s Starland in 1990, Mickey’s Toyland in late 1995, and finally as Mickey’s Toontown Fair for the summer of 1996.

But before we get there in Disney history, let’s take a stroll back in time to Duckburg, U.S.A., to help wish our pal Mickey a happy 60th birthday. All aboard Mickey’s Birthdayland Express, next stop—fun!

060513_D23MembersOnly_AtractionRewind_mickeys-birthdayland-feat-1

Here, Minnie Mouse helps a talented and dedicated team of artists complete a “surprise” cake for Mickey. This large set piece would appear in Minnie’s Surprise Birthday Party, the featured show that ran from June 18, 1988, to April 22, 1990, in Mickey’s Birthdayland.

060513_D23MembersOnly_AtractionRewind_mickeys-birthdayland-feat-2

Goofy prepares to trim the hair of an artist touching up the façade of “Goofy’s Clip Joint Barber Shop” – one of the many Duckburg-inspired toon-themed buildings and storefronts that populated the area. Other facades included McDuck’s Mansion, Daisy’s Café, Duck County School, McDuck’s Bank, the S.S. Donald Duck, and others. These quirky locales proved to be popular picture spots for many guests.

While birthday festivities took place at Magic Kingdom Park, the Walt Disney World Railroad temporarily was called the Mickey’s Birthdayland Express. Guests boarded the famous railway for a scenic trip around the Magic Kingdom, embarking on to Mickey’s Birthdayland where the whole family could partake in the party.

Duckburg, U.S.A. welcomed you to help celebrate Mickey’s 60th Birthday!

Duckburg, U.S.A. welcomed you to help celebrate Mickey’s 60th Birthday!

Grandma Duck’s Farm, and the famous tri-circle spotted cow, Minnie Moo, entertained guests from June 18, 1988 to March 11, 1996.

Grandma Duck’s Farm, and the famous tri-circle spotted cow, Minnie Moo, entertained guests from June 18, 1988 to March 11, 1996.

This birds-eye view of Mickey’s Birthdayland showcases the general layout of the area. Note Mickey’s house at center (complete with car parked in the driveway), and the several small Duckburg-themed facades near the front sides of the larger show tents. Weather eyes can spot Cornelius Coot Commons at the top left. This small square and fountain was dedicated to the founder of Duckburg, U.S.A., Cornelius Coot.

This bird’s-eye view of Mickey’s Birthdayland showcases the general layout of the area. Note Mickey’s house at center (complete with car parked in the driveway), and the several small Duckburg-themed facades near the front sides of the larger show tents. Weather eyes can spot Cornelius Coot Commons at the top left. This small square and fountain was dedicated to the founder of Duckburg, U.S.A., Cornelius Coot.

The large, memorable statue of Cornelius Coot would hold over into Mickey’s Starland in 1990, and Mickey’s Toontown Fair in 1996 (though with a new, corncob shaped base, pictured here). After the closing of the Fair in early 2011, the statue of Coot was safely transitioned to the Walt Disney Archives where it proudly resides today as a fun (and heavy) reminder of the growth and change that has occurred in that section of Magic Kingdom Park. It’s a fine piece of Disney craftsmanship and history, representing more than 20 years of fun-filled and whimsical memories.

The large, memorable statue of Cornelius Coot would hold over into Mickey’s Starland in 1990, and Mickey’s Toontown Fair in 1996. After the closing of the Fair in early 2011, the statue of Coot was safely transitioned to the Walt Disney Archives, where it proudly resides today as a fun (and heavy) reminder of the growth and change that has occurred in that section of Magic Kingdom Park. It’s a fine piece of Disney craftsmanship and history, representing more than 20 years of fun-filled and whimsical memories.

Woo-Hoo! Take a Tour of Duckburg

You may remember the city of Duckburg from DuckTales, where Scrooge McDuck had his mansion on one end of town and his coveted money bin on the other. Our partners at Disney Television Animation uncovered some background art that shows off the streets and alleyways of Duckburg.

Let’s take a closer look at this beautiful background art.


Be Our Guest Restaurant’s Salmon with Leek Fondue

Ingredients

Leek Fondue
1/2 pound leeks, roots and tough dark green tops removed and discarded
1/2 cup diced white onion
1 teaspoon chili flakes
1 cup orange juice
1/2 cup white wine
1/2 teaspoon coarse salt, plus additional to taste
2 tablespoons butter
Freshly ground black pepper, to taste Saffron Potatoes
2 pounds Yukon gold potatoes, quartered
1 teaspoon saffron
1 cup cream
2 tablespoons butter
1 teaspoon coarse salt, plus additional to taste
Freshly ground black pepper, to taste Salmon
4 (7-ounce) skinless salmon fillets
Extra virgin olive oil
Coarse salt and freshly ground black pepper, to taste

Garnish
Fresh chives

Preparation

For Leek Fondue
Quarter leeks, slice, and place in a bowl of clean water; wash leeks in water, letting any dirt fall to the bottom. Drain and pat dry with paper towels. Combine leeks, onion, and chili flakes in a small saucepan. Add orange juice and wine, stir to combine, and bring to a boil over high heat. Stir in salt. Reduce heat to medium and simmer until leeks are very tender, about 35 minutes. Remove from heat and stir in butter.

For Saffron Potatoes
Combine potatoes with enough cold water to cover by 1 inch in a large saucepan. Lightly crush saffron and add to the pan; stir to combine. Bring to a boil over high heat, then simmer, covered, until potatoes are fork-tender, about 10 minutes. Drain potatoes and return to pan over very low heat; add cream and butter, and mash. Season to taste with additional salt and pepper.

For Salmon
Season salmon with salt and pepper. Place enough oil in a large sauté pan to lightly coat the bottom. Heat oil over medium-high heat until it shimmers; add salmon fillets and cook until just opaque in the center, approximately 3 to 4 minutes per side depending on thickness.

To serve:
Place a dollop of saffron potatoes in the center of each serving plate. Place a salmon fillet over potatoes and top with approximately 3 tablespoons of leek fondue. Garnish with chives, if desired.

This recipe has been converted from a larger quantity in the restaurant kitchens. The flavor profile may vary from the restaurant’s version. All recipes are the property of Walt Disney Parks and Resorts U.S., Inc., and may not be reproduced without express permission.


`AMA`AMA’s Pineapple-Coconut Cobbler

Savor some of the sweet flavors of the South Seas

with this mouthwatering recipe for Pineapple-Coconut Cobbler.

This delicious dessert blends the rich creaminess of coconut and the tart sweetness of pineapple
– Hawai’i’s signature fruits.

At Aulani guests will find authentic island fare with a contemporary twist. Patrick Callarec, executive chef, Aulani, brings 30 years of culinary savoir faire to the new resort’s dining experience. Having worked in Hawai`i before, he was thrilled at the prospect of building a menu for the new resort from the ground up with the Islands’ generous array of local products. “To create this type of contemporary cuisine on an island where you have an incredible abundance of seafood and all the local farmers is great,” the French-born chef says.

“It allows you to be very creative and use some of the freshest ingredients in the world.”

This delicious dessert from Aulani’s `AMA`AMA restaurant blends the rich creaminess of coconut and the tart sweetness of pineapple—Hawai`i’s signature fruits. Top the warm confection with vanilla ice cream and bring the taste of Aulani into your own home.

Ingredients

1 medium pineapple, peeled, cored, and diced
1/3 cup packed light brown sugar
1 cup shredded coconut
1/2 cup all-purpose flour
1/2 cup sugar
1/2 cup whole or 2% milk
1/4 cup melted butter
1/4 teaspoon baking powder
Pinch fine salt
Vanilla ice cream, for serving

Preparation

Preheat oven to 350°F. Butter a small (8×6-inch) baking pan; set aside. Combine pineapple and sugar in a medium sauté pan over medium heat. Cook until sugar melts and mixture is golden.

Transfer mixture to a bowl, stir in coconut, and set aside. Combine flour, sugar, milk, melted butter, baking powder, and salt in a large bowl; stir until combined. Pour batter into prepared baking pan, and top with pineapple mixture. Bake 35 to 45 minutes, or until golden brown and cooked through. Serve warm with vanilla ice cream. Serves 6.

This recipe has been converted from a larger quantity in the restaurant kitchens. The flavor profile may vary from the restaurant’s version. All recipes are the property of Walt Disney Parks and Resorts U.S., Inc., and may not be reproduced without express permission.

Trader Sam’s Panko-Crusted Chinese Long Beans with Sriracha Mayonnaise

Trader Sam’s Enchanted Tiki Bar, which takes its name from the familiar “head salesman” of the Disneyland Jungle Cruise, not only has fantastic beverages, but amazing food!

D23 presents a hot appetizer from Trader Sam’s Enchanted Tiki Bar,

at the Disneyland Hotel, to pair with the restaurant’s enchanting drinks.

Ingredients

Sriracha Mayonnaise
3/4 cup mayonnaise
1 teaspoon sriracha (Asian chili sauce)
1 teaspoon rice wine vinegar
1 teaspoon coarse salt
1 teaspoon cleaned and thinly sliced green onion, green part only
1/4 teaspoon fresh lime juice
1/4 teaspoon chopped garlic
1/8 teaspoon freshly ground black pepper
Panko-Crusted Chinese Long Beans
1 cup all-purpose flour
1 tablespoon seafood spice
1 tablespoon cornstarch
1 teaspoon garlic powder
1 teaspoon onion powder
1/2 teaspoon coarse salt
1/8 teaspoon freshly ground black pepper
4 cups canola oil, for frying
3/4 pound Chinese long beans*, cut into 4-inch-long pieces
4 eggs, beaten2 cups panko (Japanese bread crumbs)
Coarse salt, to taste
*Chinese long beans can be found in Asian-foods supermarkets. You may substitute thin green beans.

Sriracha Mayonnaise
Combine mayonnaise, sriracha, vinegar, salt, green onions, lime juice, garlic, and pepper in small bowl. Refrigerate until ready to serve.

Panko-Crusted Chinese Long Beans
Combine flour, seafood spice, cornstarch, garlic powder, onion powder, salt, and pepper in a shallow bowl. Line a baking sheet with paper towels; set aside. Pour oil in a deep pot to a depth of 1 inch. Heat over medium-high heat to 350°F. Moisten long beans; dredge in flour mixture. Dip in beaten eggs, then roll in panko. Working in batches, gently place in hot oil until golden brown, about 2 to 3 minutes, using tongs or a slotted spoon to gently turn beans every 45 seconds. Transfer fried beans to prepared baking sheet and season lightly with salt. Serve with Sriracha Mayonnaise.

This recipe has been converted from a larger quantity in the restaurant kitchens. The flavor profile may vary from the restaurant’s version. All recipes are the property of Walt Disney Parks and Resorts U.S., Inc., and may not be reproduced without express permission.

Toy Story Hamm-It-Up Cookies

These Toy Story Hamm caricature cookies will prove as popular as the pig that inspired them.

Ingredients

Batch of sugar cookie dough (see recipe below)
1 to 114 cups white decorating cookie icing (sold in the baking aisle of the grocery store)
Red food coloring
Mini pink jelly beans
Chocolate chips
Chocolate sprinkles
Small red gumdrops

Preparation

  1. Roll half of the dough to 14-inch thickness.
  2. Use a 214-inch round cookie cutter to cut out circles for the pigs’ heads, and bake them according to the recipe directions.
  3. Roll out the remaining dough to 38-inch thickness, and use a 112-inch round cookie cutter to cut out a “snout” for each head. Again, bake the cookies as directed.
  4. Meanwhile, slice a jelly bean in half, as shown, to create a pair of nostrils for each pig.
  5. Next, stir a bit of red food coloring into the cookie icing until you have a shade of pink you like.
  6. One at a time, frost the smaller snout cookies and gently press a pair of nostrils into the icing. Set the snouts aside until the icing hardens.
Toy Story Hamm it Up Cookie Jelly Beans
Slice a jelly bean in half, as shown, to create a pair of nostrils for each pig. Next, stir a bit of red food coloring into the cookie icing until you have a shade of pink you like.

Frost one of the larger round cookies and gently press one of the snouts into the icing near the lower edge of the head. Before the icing sets, press a pair of chocolate chip eyes (tips down) in place, and add chocolate sprinkles for eyebrows. For ears, slice a red gumdrop in half vertically, as shown. Remove a thin slice from the bottom of each ear to create a sticky surface, and press the ears in place against the top of the cookie, using dabs of icing to help hold them if needed.

Assemble the rest of the cookies in the same manner. Allow the icing to fully set up before serving the cookies. Makes about 2 dozen Hamm-it-up cookies.

Sugar Cookie Dough

When you’re making cut-out cookies, you need dough that will hold its shape during baking, and this recipe fits the bill. Many of the ready-made refrigerated doughs sold at grocery stores tend to spread, so if you plan to use one of them, you’ll probably need to add flour to stiffen it. Either way, it’s always good practice to do a trial run by first baking a single cookie to see how it holds up. If the dough loses its shape, try chilling it or kneading in a bit more flour.

Ingredients

234 cups flour
1 teaspoons baking powder
12 teaspoon salt
11 tablespoons butter, softened
34 cup granulated sugar
1 large egg
1 teaspoon vanilla extract

Preparation

  1. Sift together the flour, baking powder and salt into a bowl, and then set the mixture aside.
  2. In a large mixing bowl, beat the butter and sugar until light and well combined.
  3. Add the egg and vanilla extract and beat well. Stir in the flour a third at a time.
  4. After the last addition, knead the dough briefly if needed to incorporate all of the flour. The finished dough should be smooth and stiff.
  5. Divide the dough into two portions, pressing each into a disk and wrapping it in plastic. Keep the dough chilled until you plan to use it.
Toy Story Hamm it Up Cookies
Frost one of the larger round cookies and gently press one of the snouts into the icing near the lower edge of the head. Before the icing sets, press a pair of chocolate chip eyes (tips down) in place, and add chocolate sprinkles for eyebrows.

When you’re ready to bake the cookies, work with one disk of dough at a time. Allow the dough to set at room temperature briefly so that it softens just enough to roll it.

Meanwhile, heat the oven to 350 degrees and line a baking sheet with parchment paper. Set the dough on a flour-dusted sheet of waxed paper and roll it out to 14-inch thickness. Cut out the cookies and bake them until the edges turn a light golden brown, about 6 to 9 minutes, depending on the size. Then transfer the cookies to a wire rack to cool.

Never-Before-Released, Exclusive Photos From Walt Disney’s Camera Found in the Walt Disney Archives

When the D23 staff visited the Walt Disney Archives to examine some extremely rare photographs sourced from rolls of film found in Walt’s personal camera (see more discoveries in the latest episode of Armchair Archivist), the pinch-me moments that followed lasted only for a few seconds. Disney archivists had recently rediscovered these amazing photographs and were excited to share the magic these images had in store. Here we present a sampling of this collection; glimpses of the extraordinary life of Walter Elias Disney.

Disney fans are well aware of some of Walt Disney’s original inspirations for Disneyland, as described in this 1963 interview with the Canadian Broadcasting Company, where he remembers trips to the Griffith Park merry-go-round.

As Walt explains in the above video, Sundays were daddy’s time to be with his daughters, and they would often visit the carousel at Griffith Park in Los Angeles, California.photo of young Roy E. Disney Riding Carousel Griffth Park, Los Angeles circa 1930s

Photographs from the camera reveal that Roy E. Disney also accompanied his uncle’s family—at least he did on this occasion (c. late 1930s).

Additionally, these photo below were taken with Walt’s personal camera throughout his life. The photos show candid moments, now available to the general public, from his travels.