Star Wars: The Force Awakens Red Carpet Recap

Star Wars: The Force Awakens jumped into hyperspace this week, taking over all three of Hollywood Boulevard’s storied theaters—the TLC Chinese Theatre, the El Capitan Theatre, and the Dolby Theatre—in one of the biggest red-carpet premieres ever. Director J.J. Abrams was joined by a galaxy of Hollywood’s brightest stars, including the entire cast of The Force Awakens, heralding the arrival of the seventh film in Lucasfilm’s blockbuster Star Wars franchise. Original trilogy actors Mark Hamill, Carrie Fisher, and Harrison Ford joined newcomers Daisy Ridley, John Boyega, Oscar Isaac, Adam Driver, Gwendoline Christie, and Lupita Nyong’o, delighting the crowd of fans and journalists.

D23 was able to talk with many fan favorites on the red carpet, including Ridley, Ford, Isaac, Boyega, Hamill, Lucasfilm President and Star Wars: The Force Awakens producer Kathleen Kennedy, actor Anthony Daniels (C-3PO), Boyega, and Disney Chairman and CEO Bob Iger.

Watch D23’s video from the red carpet!

View a photo gallery from the red carpet.

Paddy Mint Mocha

This specialty coffee is served during the winter holidays on the Disney Cruise Line, a festive ending for a dinner party – or any time of day.

Our friends at Walt Disney Parks and Resorts are featuring this recipe in their new cookbook, Even More Delicious Disney Desserts, and we think you’ll enjoy making it as much as guests of the Disney Cruise Line enjoy eating it.

Ingredients
1 ounce espresso
1 ounce chocolate mint syrup
11 ounces steamed milk
2 ounces chocolate syrup, divided
Whipped cream, for topping

Instructions
Mix espresso, chocolate mint syrup and 1 ounce of chocolate syrup in a glass mug. Slowly pour in warm milk. Top with whipped cream and drizzle with remaining chocolate syrup.

Create a Tinker Bell Ornament

If you want to add a little “pixie dust” to this year’s Christmas tree, look no further than our Tinker Bell ornament! Feel free to personalize this ornament by using your favorite colors—for the glitter and sequins, for the sticker letters, and even for the confetti snowflakes. Just make sure you use a clear bulb, so you can see all of Tink’s magic inside!

Supplies:
8.5 x 11-inch white printer paper
3.25-inch round clear glass ornament(s)
Glitter (holiday colors of your choosing)
Confetti snowflakes (white, or holiday colors of your choosing)
Ribbon
Sticker letters, under 1-inch in size (found in scrapbooking section of craft store)
Monofilament (fishing line or jewelry “illusion cord”)
Glue stick
Scissors or Exacto knife

OPTIONAL:
Small funnel
Sequins (holiday colors of your choosing)

  1. Download and print out the two Tinker Bell images (Page 1) onto a piece of regular printer paper.
  1. Using scissors, or an Exacto knife (make sure to use an appropriate cutting surface), cut both Tinks out along their grey outlines—leaving only a small white border around each image. (NOTE: You don’t have to make two ornaments; feel free to choose which Tink you like most!)
  1. Remove the ornament cap and—either with your (optional) funnel, or by creating a funnel from a piece of paper—pour your glitter into the bottom of the ornament, filling it to about a quarter full. (Use one color, use several… it’s up to you!)
  1. Slightly bending each confetti snowflake, insert several into the ornament so that they lay on top of the bed of glitter.

OPTIONAL:
Alternately—or even in addition to (the sparklier, the better!)—pour some holiday-colored sequins into the ornament.

  1. Using scissors, cut approx. 7 inches of monofilament.
  1. Tie a small knot at the end of your piece of monofilament. Then, using the glue stick, cover one side of printout (white side up) with glue. Align the string along the center of the glued side, with the knot at the bottom near Tinker Bell’s feet (just outside of the cutout). Fold the opposite side over—at the middle point between the wings—and press together; both sides should now match. Trim excess line from the bottom of the cutout, if desired.
  1. Slightly bend your Tink cutout (or lightly wrap it around a pencil) and place into the ornament, leaving remaining monofilament free on the outside of the bulb.
  1. Pull the top of the monofilament line through one hole on the ornament cap and tie it to looped wire hanger and then replace the cap, leaving Tinker Bell “dangling” into the glitter.
  1. Affix the sticker letters to spell “PIXIE DUST” on the outside of the ornament.
  1. Tie a piece of ribbon to the ornament’s looped wire hanger, and place on your tree.
  1. It’s like your very own (and very Christmas-y) “second star to the right”! Enjoy!

NOTE: Cutting—especially with an Exacto knife—should be done by an adult.

Mickey’s Christmas Carol, as told on Main Street, U.S.A.

For decades, families have enjoyed the Emporium’s whimsical window displays on Main Street, U.S.A., both at Disneyland and Walt Disney World. One of the most memorable of these is a series of vignettes telling the story of Mickey’s Christmas Carol (1983), the Academy Award®-nominated featurette based on the classic tale by Charles Dickens.

Here, we present a collection of vintage photographs documenting the display as it appeared in its early years.

780w-463h_mickey-christmas-carol-main-street-1

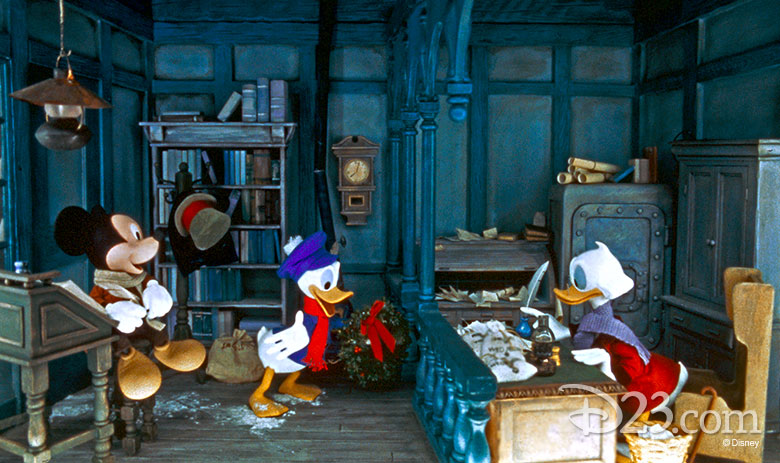
The first scene depicts the moment when Scrooge’s nephew Fred (played by Donald Duck) invites his uncle to Christmas dinner, as the hardworking Bob Cratchit (played by Mickey Mouse) looks on. We all remember what Scrooge’s response was!

780w-463h_mickey-christmas-carol-main-street-2

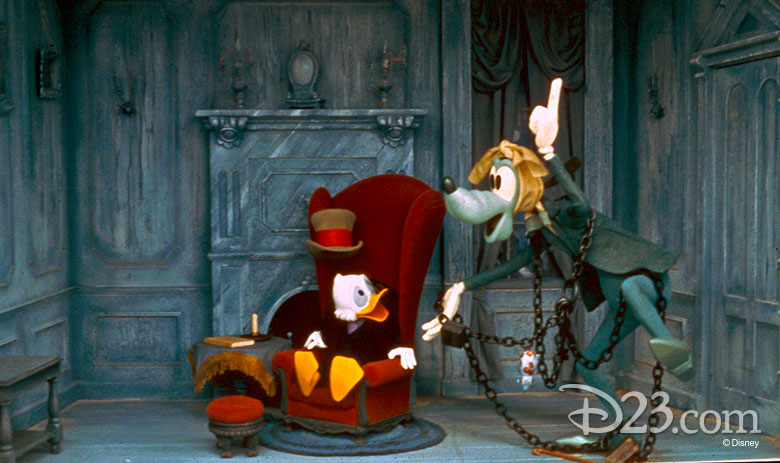
After refusing his nephew’s invitation, Scrooge retires to his home on Christmas Eve, when the ghost of his deceased business partner, Marley (played by Goofy), haunts our protagonist in a way only Goofy can. Marley warns of three spirits who will visit Scrooge that evening…

780w-463h_mickey-christmas-carol-main-street-3

…The first of them—the Ghost of Christmas Past (played by Jiminy Cricket)—takes Scrooge back to the moment he broke the heart of his lovely Isabelle (played by Daisy Duck) by tending too much to his finances and too little to her.

780w-463h_mickey-christmas-carol-main-street-4

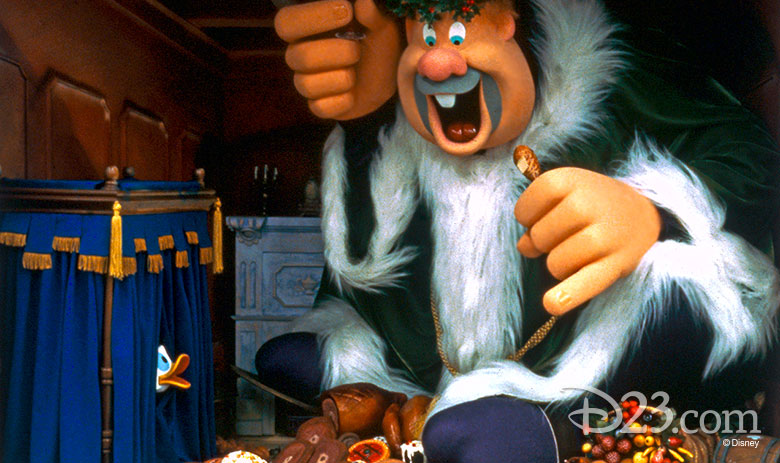
Next, the Ghost of Christmas Present (played by Willie the Giant from Mickey and the Beanstalk) visits Scrooge with his array of appetizing food, which contrasts strikingly with the modest dinner inside the Cratchit home.

780w-463h_mickey-christmas-carol-main-street-5

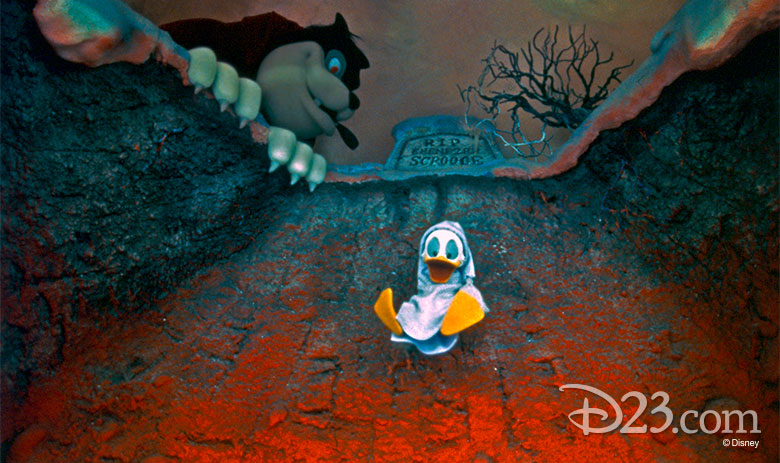
Finally, the Ghost of Christmas Future (played by Pete) turns up the heat, showing Scoorge his fate, should he not change his ways.

780w-463h_mickey-christmas-carol-main-street-6

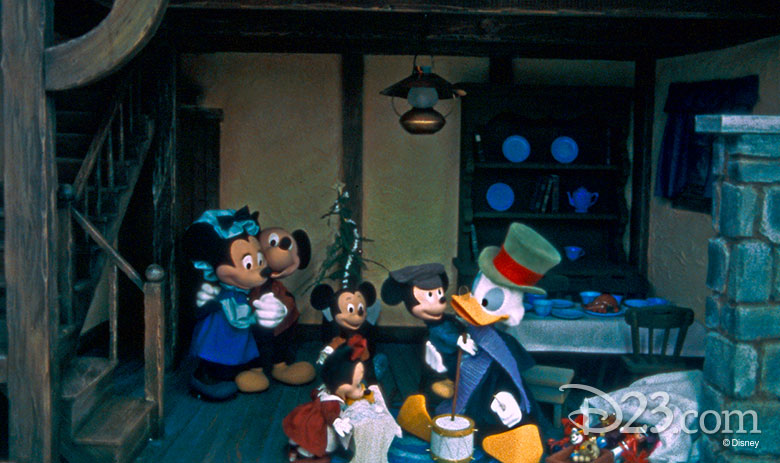
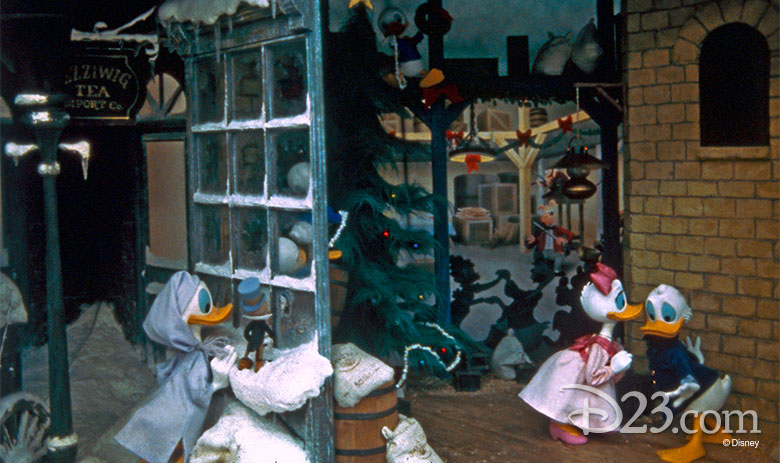
Learning his lesson, Scrooge brings gifts to the Cratchit family on Christmas morning, sharing hope and joy to a most appreciative Tiny Tim.

Guests can also enjoy a refreshed version of these beautiful scenes at Magic Kingdom Park, where the displays have returned to the Emporium for the 2015 holiday season!

Did You Know? Mickey’s Christmas Carol was inspired by a 1974 Disney record album. While most of the cast stayed the same for the 1983 film, the original album featured Merlin from The Sword in the Stone as Christmas Past and the “witch” from Snow White and the Seven Dwarfs as Christmas Future!

Double Chocolate Yule Log

Disney Cruise Line sails over this decadent recipe that’s sure to warm you up for the holidays.

Ingredients

Chocolate Sponge Cake
¼ cup dutch-process unsweetened cocoa powder
¼ cup all-purpose flour
4 large eggs, room temperature
½ cup plus 2 tablespoons sugar

Chocolate Ganache
6 ounces (about ¾ cup) chopped bittersweet chocolate
½ cup hevy cream

Chocolate Mousse
5 ounces dark chocolate, coarsely chopped
1 tablespoon dark rum
¾ cup heavy cream

Chocolate Glaze
¾ cup chopped dark chocolate
1 tablespoon light corn syrup

Step-by-step Directions

For chocolate sponge cake:

  1. Preheat oven to 400°. Line the bottom of a 13x9x2 metal baking pan with parchment paper. Spray generously with nonstick spray with flour. Set aside.
  2. Sift flour and cocoa powder into a small bowl; set aside.
  3. Crack eggs into a large bowl. Beat eggs with an electric mixer on low speed for 1 minute. Increase speed to medium-high and add sugar. Beat until mixture is thick and pale, about 3 minutes.
  4. Sift dry ingredients over egg mixture and fold until just blended.
  5. Transfer batter to prepared pan, spreading evenly to edges. Bake until cake springs back when pressed gently with your fingertips, 10 to 12 minutes.
  6. While cake is still warm, slide it out of the pan, with the parchment still attached, onto a clean kitchen towel. Beginning at one narrow end, use the kitchen towel to roll the cake—along with the parchment paper—into a cylinder.

For chocolate ganache:

  1. Place chocolate in a medium heat-safe bowl. Heat cream in a small saucepan until hot (do not boil).
  2. Pour cream over chocolate and stir until chocolate melts.

For chocolate mousse:

  1. Bring a few inches of water in a small pot to a gentle simmer over medium heat. Combine chocolate and rum in a medium heat-safe bowl that can sit atop the pot of water without touching the water.
  2. Place the bowl on the pot and heat until chocolate is melted, stirring often. When mixture is smooth, remove from heat and set aside to cool until no longer warm to the touch.
  3. Whip cream at high speed to speed to stiff peaks, about 2 minutes; do not overbeat.
  4. Stir ¼ of whipped cream into chocolate to lighten. Gently fold ⅓ of remaining whipped cream into chocolate until combined but not fully incorporated and some streaks remain. Fold in remaining cream in two batches, mixing to fully incorporate when the last batch is added.

For chocolate glaze

  1. Bring a small pot of water to a gentle simmer over medium heat. Combine chocolate and corn syrup in a medium heat-safe bowl that can sit atop the pot of water without touching the water.
  2. Heat in a bowl until chocolate melts and ingredients are well combined.

To assemble:

  1. Carefully unroll cake from the towel; remove towel. Spread ⅔ of mousse over cake surface. Roll cake back up, over the mousse, peeling off the parchment paper as you go.
  2. Once the cake is rolled, wrap the parchment paper around to keep it round, place it seam side down on a platter, and refrigerate cake for about an hour, until firm.
  3. Remove parchment paper from cake and evenly spread remaining mousse over cake. Pour glaze over top; refrigerate until glaze has set, about 30 minutes, before serving.

D23 Day of Christmas 2017 back to home banner

Build a Mickey Mouse Pop-Up Clubhouse

This whimsical craft celebrating Walt Disney’s original Mickey Mouse Club was created by the Walt Disney Productions character merchandising division in Toronto and sent to company business partners in the 1960s. With Mickey Mouse, Donald Duck, Goofy, Ludwig Von Drake, and Pinocchio greeting recipients, the piece was inspired by the unique clubhouse set piece originally designed by Disney art director Bruce Bushman for the children’s series.

Supplies:
8.5 x 11-inch white cardstock (printable)
Glue stick or double-sided tape
Scissors or Exacto knife

  1. Download and print out both pages (Pages 1 and 2) onto your cardstock.
  1. Using the scissors, cut out the red roof on Page 2. Make sure to keep the white tabs at either side of the roof intact.
  1. Next, with your scissors (or Exacto knife), cut out the small white slit—bordered in black—on one side of the roof.
  1. With your scissors (or Exacto knife), cut out the clubhouse on Page 1. Pay special attention to some of the smaller corner images, like the chimneys; this is where an Exacto knife would come in handy. (NOTE: If using an Exacto knife, cut your clubhouse on a cutting mat or other appropriate surface.)
  1. Also, make sure to cut the edge of the tab on either side of the “Mickey posts a bill” and “Pinocchio waves hello” images—you won’t be able to fold those specific tabs back otherwise.
  1. Fold back (or “in”) each labeled tab, and fold up all four sides of the clubhouse—creating its “floor.” The general shape of the clubhouse should begin to form… (See photo for details.)
  1. Fold the middle (horizontal) crease of the roof piece, and fold both white tabs back (or “in”).
  1. Place the roof on top of the clubhouse, and glue or tape the roof tabs onto nearest clubhouse tabs.
  1. You can use your new Mickey Mouse Pop-Up Clubhouse as a bank… or just as a unique, vintage holiday decoration!

NOTE: Cutting—especially with an Exacto knife—should be done by an adult.

Watch Live Stream of Star Wars: The Force Awakens World Premiere

The world premiere of Star Wars: The Force Awakens is shaping up to be the biggest movie event of the year. Beginning at 5:30 p.m. PT (8:30 p.m. ET) today, our friends at StarWars.com will bring exclusive, live-streaming coverage presented by Verizon featuring interviews with the cast and creators of Star Wars: The Force Awakens, live from the red carpet.

Set your hyperspace coordinates now and don’t miss it!

Follow along for live updates from the red carpet on Facebook, Twitter, and Instagram @DisneyD23.

To learn more, visit StarWars.com or watch the livestream below:

Popular Toys of Disney’s Past

The year was 1929. A young Walt Disney is sitting in the bustling lobby of a New York City hotel when a man approached with an intriguing offer. Soon after, the very first licensed Mickey Mouse merchandise item was born: a children’s writing tablet featuring the world-famous mouse. In the years that followed, Christmas would never be the same…

Disney toys have helped Santa Claus bring holiday joy to children around the world for decades. With guidance from our friends at the Walt Disney Archives, we thought the time was right to rediscover some of the most popular toys (and other unique items) of Disney’s past. These images come from catalogues produced by Kay Kamen, Incorporated—a company started by Kansas City ad man Herman “Kay” Kamen, after a fortuitous meeting in 1932 with Walt and Roy Disney, to help provide high-quality Disney merchandise to retail stores around the world. See what kids of yesteryear were putting on their Christmas wish lists!

Gingerbread Cookies from Disney’s Grand Floridian Resort & Spa

Makes 36 cookies

Ingredients

  • 2 sticks softened butter
  • 2 ½ cups confectioner’s sugar, sifted
  • 2 eggs
  • 1 ¼ tsp. baking powder
  • ½ tsp. salt
  • 3 ⅔ cups all-purpose flour
  • 2 ½ teaspoons ground cinnamon
  • 2 ¼ teaspoons ground coriander
  • 2 teaspoons ground star anise
  • 1 teaspoon ground fennel
  • 1 teaspoon ground ginger
  • 1 teaspoon ground clove
  • ¼ teaspoon ground mace

Ingredients for decorations optional

  • ¼ cup milk
  • 1 cup colored sugar granules

Directions

  1. Cream the butter and sugar in a large mixing bowl until smooth using an electric mixer. Add the eggs and mix until combined.
  2. Sift all the remaining dry ingredients in a separate large mixing bowl and mix well. With the mixer on low, slowly add the dry ingredients to the butter mixture until a dough forms
  3. Remove dough from the bowl and wrap in plastic wrap; place in refrigerator until firm, two to four hours.
  4. Preheat oven to 350 degrees and grease cookie sheets.
  5. Remove dough from refrigerator and allow dough to sit at room temperature for about 15 minutes, until pliable. Divide dough in half and place on floured work surface. Using a rolling pin, roll the dough out until about 1/8 inch thick. While rolling, flour the work surface and rolling pin as needed.
  6. Cut out desired cookie shapes with cookie cutters. Transfer cookies to a greased cookie sheet, placing them 1 inch apart.
  7. Lightly brush cookies with milk and sprinkle with sugar granules as desired.
  8. Bake until firm and edges begin to darken, 10-14 minutes. Allow cookies to cool on the cookie sheet for a minute, then transfer to wire racks to cool completely.

Cook’s notes:
You can find star anise in the ethnic aisle in your local grocery store. To get the best flavor from this spice, you will need to grind the whole star anise pod. For the neatest edges, dip your cookie cutters in flour before cutting out each cookie.

This recipe has been converted from a larger quantity in the restaurant kitchens. The flavor profile may vary from the restaurant’s version. All recipes are the property of Walt Disney Parks and Resorts U.S., Inc., and may not be reproduced without express permission.

D23 Day of Christmas 2017 back to home banner