Disney’s Candlelight Processional Through the Years

Walt Disney Archives director Becky Cline shares the history of the holiday tradition at Disneyland and Walt Disney World Resort.

Candlelight Procession at Disneyland Park (1958)

The Candlelight Procession and Ceremony is one of the oldest and most beloved traditions in the 65-year history of Disney theme parks. When Disneyland celebrated its first Holiday Festival in 1955, a group of 12 Dickens carolers, under the direction of Dr. Charles C. Hirt of the University of Southern California, performed throughout the park, and guest choirs were invited to perform daily in the Main Street, U.S.A. bandstand, which was re-christened the “Christmas Bowl” for the season.

The Christmas Bowl at Disneyland Park (1955)

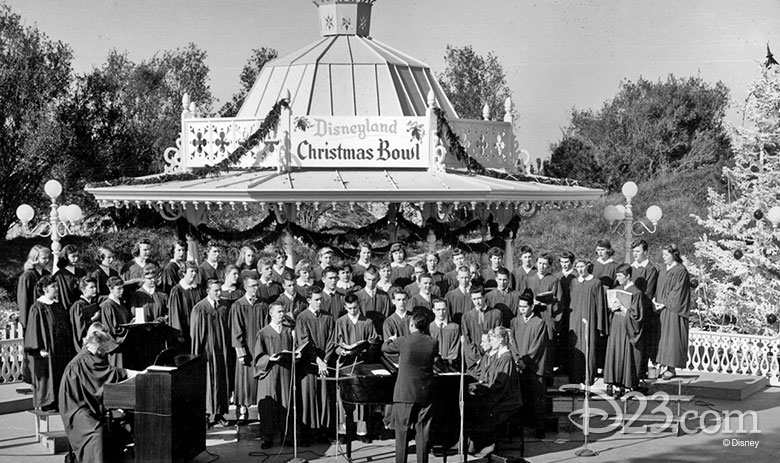
On the opening afternoon of the festival, the carolers and a 300-member massed chorus made up of visiting choirs stood together on the Train Station steps and sang Christmas carols accompanied by visiting school bands.

Massed Choirs perform on Main Street Station on December 15, 1956

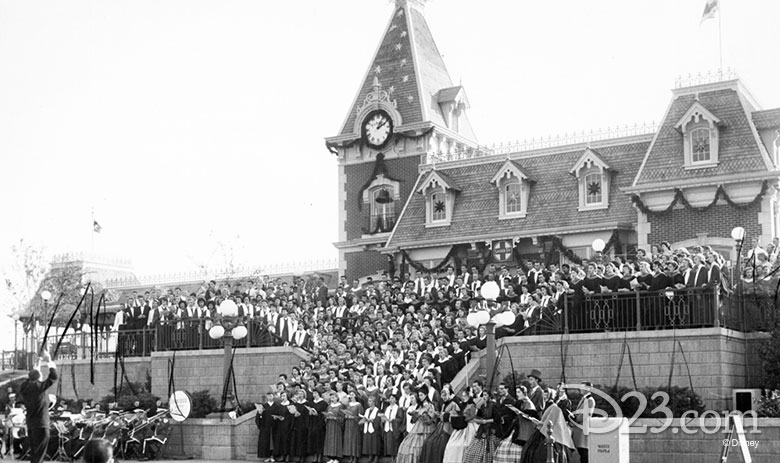
The following year, under Dr. Hirt’s direction, the carolers and singers from eight visiting choirs also performed as a group on the station steps, this time accompanied by the Disneyland Band. In 1957, the event grew larger as choirs followed the “Christmas Around the World Parade” processing together from Sleeping Beauty Castle into the Plaza where they were to perform. Unfortunately, due to the size of the crowd, the singers were unable to form a circle in the center of the Plaza as planned. Instead, they stood around the Disneyland band and performed in an informal manner.

The first Candlelight Processional at Disneyland (1958)

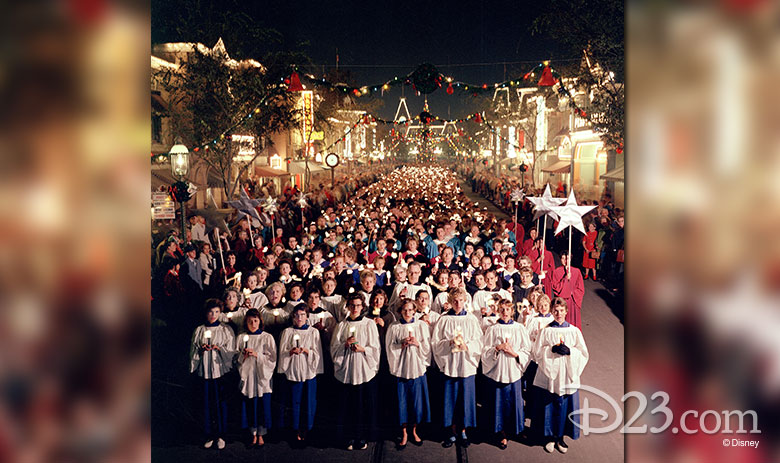
The choirs and carolers were so well received by Disneyland guests that in 1958, Dr. Hirt suggested to management that performances by a larger massed choir group would be a welcome addition to future holiday events. Therefore, in December 1958, the first evening Candlelight Processional was held with singers from 16 choirs processing down Main Street to the Plaza where they performed a full concert with the Dickens Carolers singing from the Sleeping Beauty Castle balcony above.

In 1960 the event was moved back to Town Square, and actor Dennis Morgan was invited to read portions of the Biblical Christmas story in between the classical hymns. This tradition has continued with very famous celebrities including Cary Grant, John Wayne, Henry Fonda, Jimmy Stewart, Gregory Peck, Charlton Heston, James Earl Jones, Olympia Dukakis and many others donating their eloquence to the program. The “Living Christmas Tree,” featuring the Western High School A’Capella Choir, was also incorporated into the Candlelight Ceremony that year as a centerpiece for the massed choir ceremony. Western had presented their impressive choral program at the park for the previous two years on a specially constructed “tree” made of risers. It was so well received that they were given this annual place of honor for the next 21 years until their director, Alexander Encheff, retired in 1981. In 1982, the newly formed Disney Employee Choir (volunteer Disney cast members from the Park, Studio and Walt Disney Imagineering) was selected to fill their place, an honor they have held ever since.

The Candlelight Procession and Ceremony at Disneyland (1976)

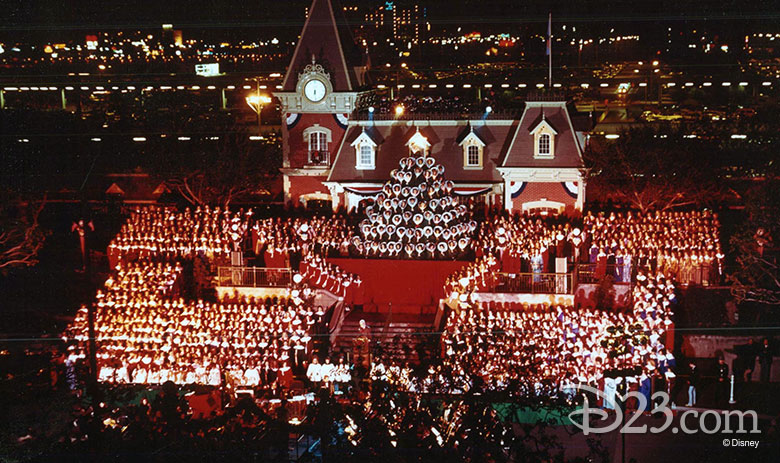
Over the years, the event has become so popular that it was also introduced at Walt Disney World’s inaugural holiday season in 1971 (starting at the Magic Kingdom, and moving to Epcot in 1994). It has grown from a simple procession of candle-lit carolers into a magnificent classical concert featuring a thousand voice massed choir, “The Living Christmas Tree”, orchestra, fanfare trumpets, bell choir, soloist, sign-language interpreter, guest conductor, and celebrity narrator. But for all of its grandeur, Disney guests particularly love Candlelight for the way it makes them feel each holiday season.

Actor Howard Keel, who narrated the ceremony at both Disneyland and Walt Disney World in the 1980s, put it best. “I’ve never been a very religious person, but when you stand up there for all of those people with that incredible chorus and orchestra beside you, it’s a wonderfully moving experience.

“In fact,” he added, “I was so moved I could hardly speak.”

Pozole from Disney California Adventure Park

This delicious dish can be found at the Paradise Garden Grill for the Viva Navidad celebration at Disney California Adventure Park.

Serves 8 – 10

Ingredients

  • 2 pounds pork shoulder, cut into 1 to 1½-inch cubes
  • 6 garlic cloves, peeled, and split lengthwise
  • 2 bay leaves
  • 1 large yellow onion, diced
  • 1 teaspoon ground cumin
  • 2 tablespoons coarse salt, divided
  • 6 dried Guajillo chiles
  • 2 dried ancho or New Mexico chiles
  • ½ medium sweet onion, cut into large pieces
  • 3 medium or 2 large plum tomatoes, cut in half lengthwise and cored
  • 2 garlic cloves, peeled
  • 1 teaspoon freshly ground black pepper
  • 1 tablespoon Mexican oregano
  • 1 (15-ounce) can white hominy, drained and rinsed

Garnishes

  • ½ small head green cabbage, finely shredded
  • 6 radishes, sliced thinly
  • 3 limes, quartered
  • 1 bunch fresh cilantro, large stems removed, leaves roughly chopped
  • ½ medium onion, finely diced

Instructions

  1. Rinse diced pork under cold water until water runs clear. Transfer pork to a large stock pot over medium-high heat; add 8 cups cold water. Bring to a simmer; skim off and discard foam and solids that float to surface.
  2. Stir in garlic, bay leaves, onion, cumin, and 1 tablespoon salt. Turn heat to medium to keep soup at a light simmer. Cover and simmer 90 minutes (do not boil). Periodically skim foam from surface.
  3. Meanwhile, remove and discard stems, seeds, and large veins from dried chiles. Break into large pieces in a medium saucepan and add 3 cups water. Top with sweet onion, tomatoes, and garlic cloves, keeping chiles submerged. Cover and simmer 10 minutes, then remove from heat and set aside 15 to 20 minutes.
  4. Working in 2 batches, puree chile mixture with cooking liquid in a blender until smooth. Pour mixture through a fine-mesh sieve into soup pot, pressing solids with back of spoon to extract liquid.
  5. Simmer soup for 90 minutes, then stir in black pepper, oregano, and hominy. Taste and season with additional salt, if desired.
  6. Remove a piece of pork and taste for doneness. If meat is not tender, simmer 15 to 20 minutes more.
  7. Serve hot soup with garnishes for topping.

This recipe has been converted from a larger quantity in the restaurant kitchens. The flavor profile may vary from the restaurant’s version. All recipes are the property of Walt Disney Parks and Resorts U.S., Inc., and may not be reproduced without express permission.

Create Mickey and Minnie Candles

What’s more festive than bringing Mickey and Minnie Mouse to your holiday celebration? They might not be able to attend in person—but you can light up your night with these candles inspired by our favorite animated duo… (Note: You can also use red, black, and yellow paper to create these looks.)

Supplies:
Red felt (18 x 12-inch sheet)
Black ribbon (3 yards of ⅞-inch wide)
Yellow ribbon (3 yards of ⅞-inch wide)
8mm round faux pearls
2 small white buttons (1-inch in diameter)
Small bows, 1 yellow and 1 black (approx. 2-inch wide each)
Mason jar candles (recommended: 12-ounce size)
Scissors
Hot glue gun
Permanent marker (i.e., Sharpie)
Ruler

  1. Take your sheet of red felt and wrap it, horizontally, around the candle to measure out desired circumference length (for a 12-ounce mason jar, that’s approximately 10.5 inches). Use your permanent marker and ruler to mark out where you need to cut.
  1. Next, cut two 3-inch-wide strips of felt—enough to wrap around the candle’s outer surface area, just inside the bevels seen at the top and bottom of the jar. (See photo for detail.) And don’t worry: You will end up with some leftover felt once you’re finished with this craft…

FOR THE MICKEY CANDLE:

  1. Apply hot glue to the front of the mason jar candle and place one of your red felt strips around the jar, using hot glue to seal it closed on the back edge. (Keep the side with any marker lines facing in.)
  1. Next, take your black ribbon, measure around the circumference of the candle, and cut to length (again, approximately 10.5 inches).
  1. Do the same for the yellow ribbon.
  1. Align the top edge of the black ribbon (horizontally) to the top of the red felt and hot glue in place—sealing the ends on the back with glue.
  1. Align the bottom edge of the yellow ribbon (horizontally) with the bottom of the red felt and hot glue in place—again sealing the ends on the back with glue.
  1. Center the two white buttons on the lower half of the exposed red felt and hot glue in place. (See photo for details.)

FOR THE MINNIE CANDLE:

  1. Before gluing the 3-inch red felt strip around the second candle, lay it out on your work surface and visually measure out where you want to apply the pearls. (You can use your ruler and marker, if need be.) In our example, we applied five pearls in the first row; six in the second (offset with the top row); and five in the third (matching the top row). Allow to dry.
  1. Then, apply hot glue to the front of the mason jar candle and place the red felt strip around the jar, using hot glue to seal it closed on the back edge. (Keep the side with any marker lines facing in.)
  1. Take your black ribbon, measure around the circumference of the candle, and cut two pieces to length (again, approximately 10.5 inches).
  1. Align the top edge of one black ribbon piece (horizontally) to the top of the red felt and hot glue in place—sealing the ends on the back with glue.
  1. Align the bottom edge of the second black ribbon piece (horizontally) to the bottom of the red felt and hot glue in place—sealing the ends on the back with glue.

FOR BOTH CANDLES:

  1. Finish off the Mickey candle by attaching the small 2-inch black bow to the front of the jar lid with hot glue. (See photo for details.)
  1. Finish the Minnie candle by attaching the small 2-inch yellow bow to the front of the jar lid with hot glue. (See photo for details.)

BONUS TIP:
+ To get extra crafty, create your own small 2-inch bows!

NOTE: Cutting—and any hot gluing—should be done by an adult.

Disney Favorites on ABC This Weekend

Like the song goes, “There’s no place like home for the holidays.” And this weekend there’s truly no place like your comfy couch on Saturday and Sunday evenings with your TV tuned to ABC. On Saturday, December 12, tune in to the network’s broadcast of The Wonderful World of Disney Presented by Target Brings You Mary Poppins at 8 p.m. ET/PT—featuring Disney Legend Dick Van Dyke as your host for a series of interstitials throughout the evening. On Sunday, ABC goes back a little further in the Disney canon to present Behind the Magic: Snow White and the Seven Dwarfs, an all-new special that chronicles Walt Disney’s challenging journey to create the historic first full-length animated feature film. You won’t want to miss a minute, so make sure your popcorn is popped before the broadcast begins at 8 p.m. ET/PT.

780w-463h_abc-tv-specials-1
Click the image above to see Dick Van Dyke speak about what makes Mary Poppins so powerful.

Your weekend of classic Disney entertainment starts on Saturday—which just so happens to be the day before Mr. Van Dyke celebrates his 90th birthday—as the actor who brought to life Bert, the carefree Cockney chimney sweep, hosts the first network television broadcast of Mary Poppins in 13 years. He’ll have a little help from Bullseye—Target’s adorable bull terrier mascot—and will take viewers on a magical journey into Disney’s Archives, showing off props from the movie, sharing behind-the-scenes stories about the film, and reflecting upon what has given Mary Poppins such phenomenal staying power.

780w-463h_abc-tv-specials-2

The following night, Disney fans will be reminded of the many reasons why Snow White and the Seven Dwarfs was such a groundbreaking film when it was released in 1937. Before Walt Disney put everything on the line to realize his vision, there had simply never been anything like Snow White and the Seven Dwarfs in cinema. No one—including Walt’s wife, Lillian, and his brother Roy—believed that audiences would want to watch a “cartoon” for 90 minutes. But oh, how Snow White and the Seven Dwarfs would prove those naysayers wrong.

Ginnifer Goodwin (Once Upon a Time, Zootopia) narrates the special, and the filmmakers spoke with Disney and Pixar Chief Creative Officer John Lasseter, Disney Legend Richard Sherman (Mary Poppins, The Jungle Book), Frozen directors Jennifer Lee and Chris Buck, as well as Becky Cline, director of the Walt Disney Archives, and Disney historians like J.B. Kaufman (author of Snow White and the Seven Dwarfs: The Art and Creation of Walt Disney’s Classic Animated Film) to shed new light on this iconic film—which celebrates its 70th anniversary next year.

Sunday night’s special uses clips from the film, early film and audio recordings, and archival photos to help chronicle the film’s often dramatic journey to the screen. The filmmakers have also included live-action moments based on the original tale, shot with dramatic special effects treatments, along with cut scenes and characters from the animated film. Some of the original talent from Snow White and the Seven Dwarfs were also interviewed for the special, which will make you eager to watch the film in its entirety again.

So many Disney fans grew up with shows like Walt Disney’s Wonderful World of Color and The Wonderful World of Disney serving as appointment television to cap off their weekends on Sunday nights. And we’re so glad that our friends at ABC are giving us the wonderful holiday gift of a weekend of Disney entertainment across two nights, making Disney fans’ holidays even happier.

5 Fascinating Facts About Fantasia’s Nutcracker Suite

Tchaikovsky’s 1892 ballet The Nutcracker has become a holiday favorite. To celebrate this enduring classic and seasonal hallmark, Disney historian and author Alexander Rannie takes a fond look back at the stunningly beautiful Nutcracker Suite sequence from Fantasia.

FAN Frost Fairy 1

1. Americans had never seen the complete Nutcracker ballet when Fantasia premiered in 1940

It wouldn’t seem like Christmas without the melodic strains of Russian composer Pyotr Ilyich Tchaikovsky’s 1892 ballet The Nutcracker floating up from the orchestra pit, or wafting forth from the TV screen, or gliding along the grocery store aisle. But when Walt Disney’s animated interpretation of The Nutcracker Suite made its debut in 1940 as one of Fantasia’s eight musical episodes, there had yet to be a complete production of The Nutcracker in the United States. It wasn’t until Christmas Eve of 1944 that the San Francisco Ballet produced the work in its entirety. And in 1954—the same year as the first full-length recording of The Nutcracker was released on vinyl—famed choreographer George Balanchine mounted his version for The New York City Ballet. Balanchine wisely included several dozen children in the cast, knowing that their parents, extended family, and friends, would all purchase tickets. the New York City Ballet production has proved such a success that it now averages almost 50 performances every year!

780w-463h_fantasia-nutcracker-1

George Balanchine visited the Disney Studios in 1939, along with composer Igor Stravinsky (whose Rite of Spring makes a memorable appearance in Fantasia). Both were quite taken with the hippos, alligators, ostriches, and elephants in Fantasia’s send-up of classical ballet in Dance of the Hours. Stravinsky and Balanchine collaborated on numerous ballets, including one based on the music of Tchaikovsky, Le baiser de la fée. When he was 11, Stravinsky briefly saw his musical hero in the foyer of Saint Petersburg’s Mariinsky Theatre. “A glimpse of Tchaikovsky,” Stravinsky said, “was to become one of my most treasured memories.”

FAN frost fairies 2

2. Walt’s interpretation of The Nutcracker Suite has its origins in the Silly Symphonies

It’s often said that Fantasia is the ultimate Silly Symphony, with music, rather than story or character, as its driving force. But of all the segments in Fantasia, The Nutcracker Suite, with its frolicking flowers and fairies, harkens back most strongly to the earliest Silly Symphonies. Springtime (1929) was touted by the Studio as, “The first animated picture in which flowers were used to interpret a ballet.” (It was quickly followed by Summer, Autumn, and Winter in 1930). Flowers and Trees (1932) was the first commercially released three-strip Technicolor cartoon and featured a chorus of dancing daisies. But Walt was always thinking bigger, and the idea of a grander floral ballet was discussed in story meetings as early as May of 1935. The title of this opus was to be Ballet des Fleurs, and, though it was never made, many of its elements were eventually incorporated into the version of The Nutcracker Suite that we know today.

780w-463h_fantasia-nutcracker-2

3. Women played a major role in the creation of The Nutcracker Suite

Women have always played a large, if not readily visible, part in the creation of Walt Disney’s animated cartoons. In The Nutcracker Suite, more than any other segment, talented women were called upon to create some of Fantasia’s most beautiful moments. Story artists Sylvia Moberly-Holland, Bianca Majolie, and Ethel Kulsar transformed the blossoms and weeds they found on the hillsides around the Hyperion Studio into the floral soloists, corps de ballet, Cossacks, and orchid girls that populate Tchaikovsky’s Suite. Their use of pastels in storyboard drawings prompted the women in the Ink & Paint department to develop new ways of painting cels. (More on this in a moment!) In order to create the sinuous and mysterious movements of the Arabian fish, Joyce Coles of the Belcher School of Dancing was brought on board to choreograph an appropriate dance. Cole’s cohort and live-action reference model for Snow White, Marjorie Belcher (later known as Marge Champion) provided reference for the endless pirouettes of the prima ballerina in the Blossom Ballet.  And Assistant Music Cutter Louisa Field made sure that conductor Leopold Stokowski’s recordings with The Philadelphia Orchestra perfectly matched the movement of the onscreen animation.

FAN inking MilkweedsFAN dry brushingFAN air brushing

4. New Ink & Paint techniques were developed to bring The Nutcracker Suite to the screen

Walt was so impressed by the look and mood of the story sketches for The Nutcracker Suite that he asked his staff to find ways to avoid hard ink outlines and more closely mimic the pastel and painterly look of the inspirational artwork. For example, the windblown seeds in the milkweed ballet in “Waltz of the Flowers” required delicate inking, drybrush work (done with a brush whose bristles are dry, but can still hold paint), and airbrushing (similar to the effect of spray paint, and which required creating a mask (for each individual cel!) to keep certain areas free of paint). Other painting techniques employed in The Nutcracker Suite involved stippling and the use of transparent paint. It could take hours to complete a single cel, but the visually stunning end result made it all worthwhile. As Frank Thomas and Ollie Johnston wrote of the exotic lead Arabian fish, “Never has an object on celluloid looked so diaphanous and delicate.”

FAN Snow Fairies

5. The Nutcracker Suite contains stop motion animation

Animation at the Studio during Walt’s lifetime was almost exclusively hand drawn, so it’s interesting to note that The Nutcracker Suite contains animation created using stop motion, i.e., animation created by physically manipulating an object in front of the camera. In the case of The Nutcracker Suite, Walt’s animators found themselves flummoxed at how best to create the Snowflake Fairies at the end of the “Waltz of the Flowers.” Hand drawing elaborate snowflakes would not only take an enormous amount of time, but they would inevitably wobble and flop about, unable to maintain the rigid structure of frozen water.

780w-463h_fantasia-nutcracker-3

In his book Herman Schultheis and the Secrets of Walt Disney’s Movie Magic, Academy Award®-winning animator and historian John Canemaker reveals the solution. “To create this scene, Leonard Pickley, an inventive fellow in the Special Effects Department, started by suggesting that the Ink and Paint Department trace scientific diagrams of real snowflakes onto a material slightly heavier that regular cels and paint them in translucent white. Once cut out, each of the dozen or so snowflakes was secured atop revolving spools attached to small steel rails, like those used for Lionel toy trains. Black velvet covered the mechanics of the setup, and the three-dimensional snowflake models were hand-animated as the camera recorded the frame-by-frame progress down the hidden tracks.” Additional hand drawn animation of the fairies was added later. “The result,” Canemaker writes, “is a dozen scenes, each timed to the music at a progressively faster pace, that bring a snowstorm of enchanting creatures to the screen in a luminous climax to the ‘Nutcracker Suite,’ one of Disney’s most beautiful film masterpieces.”

To discover more about the Inking and Painting process, keep an eye out for author and historian Mindy Johnson’s upcoming book, Ink & Paint: The Women of Walt Disney’s Animation, available from Disney Editions in 2017.

Pumpkin Pecan Pie

Our friends at ABC’s The Chew serve up another scrumptious recipe. A hybrid of your favorite holiday pies, this pumpkin meets pecan pie combines the best of both worlds.

For more recipes and crafts, visit TheChew.com and tune in weekdays 1e|12c|p on ABC.

Servings: 8
Cooking time: 1 to 2 hours

Ingredients
1 recipe for Carla’s Perfect Pie Crust
2 tablespoons butter (softened)
½ cup granulated sugar
3 eggs (lightly beaten)
1 tablespoon white vinegar
½ teaspoon salt
1 teaspoon vanilla extract
1 cup dark corn syrup
1½ cups pecans (chopped)
¼ cup pumpkin puree
whipped cream (for garnish)
cinnamon sugar (for garnish)

Step-by-step Directions

  1. Preheat oven to 350°F. Roll out pie dough to ⅛ inch thickness and line a 9-inch pie plate, allowing excess to drape over edge. Fold over edges and crimp, then trim any remaining excess. Line the pan with parchment and pour in baking beans or weights. Bake for 10 to 12 minutes or until crust is light golden.
  2. Meanwhile, cream butter and sugar, then add beaten eggs, vinegar, salt, vanilla, and corn syrup. Stir in pecans and pumpkin puree.
  3. Pour filling into prepared pie crust. Place pie on baking sheet. Bake on center rack of oven for 40 to 50 minutes or until set. Cool completely on wire rack. Serve with a garnish of whipped cream and cinnamon sugar. *Note: If crust is browning before center is cooked, tent edges of pie with foil and continue baking.

Create a Babes in Toyland Toy Soldier Craft

A tribute to the famous climactic sequence of the 1961 musical fantasy Babes in Toyland, this holiday craft was originally produced by the Walt Disney Productions character merchandising division and sent out to company and business partners. The imaginative piece invited recipients to create their own miniature holiday display featuring the toy soldier, a Disney icon that swiftly gained popularity in the 1960s and would appear annually in Christmas parades at Disney theme parks.

This toy soldier is sure to bring a vintage Disney touch to your holiday decorations! Is that a trumpet fanfare we hear in the distance? (Feel free to follow the original instructions seen on Page 1 of the downloadable file, or follow ours below.)

Supplies:
8.5 x 11-inch white cardstock (printable)
Scissors

  1. Download and print out both pages (Pages 1 and 2) onto your cardstock. (Note: Page 1 can be printed on regular printer paper, if need be.)
  1. Using your scissors, cut out Images 1, 2, and 3 from Page 2. Then make sure to cut or “push up” any marked slots or tabs. (The slots on the soldier’s boots are a little hard to see.)
  1. Take Image 3 and form a cylinder, placing the cut-out tips in the appropriate slots. Once placed, fold them down to lock.
  1. Fold back Image 2 (vertically, down its center) so that it looks like the drawing marked “2.” on Page 1.
  1. Slide the cylinder formed from Image 3 over the body made with Image 2, locking its shoulders into the appropriate slots.
  1. Place the legs over the turned-up “feet” tabs on Image 1 and lock into the slots cut into the feet on Image 2.
  1. Fold the crease closest to the soldier’s feet up; the next crease, fold down; and the final crease, fold under—creating a small front sign. Lock the tab from the end of Image 1 into its appropriate slot.
  1. Your soldier is ready to guard all your most treasured Christmas goodies!

NOTE: Cutting should be done by an adult.

Lesser-Known Characters from “Enchanted Snow Palace”

In the late 1970s, Imagineer Marc Davis envisioned the “Enchanted Snow Palace,” an attraction that would have transported guests into the icy realms of the Snow Queen with a hypnotizing musical score by composer Buddy Baker. Although Marc’s vision didn’t materialize at a Disney theme park, his masterful concept artwork lives on in the collection of the Walt Disney Imagineering Art Library, where it is carefully preserved and continues to provide inspiration to artists and designers.

Most who have been lucky enough to glimpse these pieces might recall the gorgeous settings of the Snow Palace and its beautiful Queen. But just as Pirates of the Caribbean has its cast of whimsical skeletons and townspeople, and as the Haunted Mansion is host to a company of happy haunts, the “Enchanted Snow Palace” would have introduced its own supporting characters to bring the show to life through a series of clever vignettes.

Courtesy of the Walt Disney Imagineering Art Library, we present several concepts that “could have been,” further showcasing the creative genius of “Walt Disney’s Renaissance Man,” Disney Legend Marc Davis.

780w-463h_snow-queen-gag-sketch-2

In this piece dated April 27, 1977, Marc proposes some miscellaneous characters, including The Three Snowballs (“a cool trio!”) and a penguin entertained by a very small abominable snowman.

780w-463h_snow-queen-gag-sketch-3

Here, one can envision the motion of a cast of musical Snowball Men, whose bodies would have appeared static, but whose legs would telescope up and down on floating icebergs!

780w-463h_snow-queen-gag-sketch-1

“The South Pole Pops” would have featured an orchestra of penguins (sound familiar, Muppet*Vision 3-D fans?) conducted by a maestro seal.

780w-463h_snow-queen-gag-sketch-4

In this piece, Marc lays out a turntable that would have offered fast motion for a group of smiling skating creatures.

780w-463h_snow-queen-gag-sketch-5

Marc’s movement studies for the Snowball Men—who would leap into the air after shooting out of a cave—along with a cast of “snowsliding” animals.

780w-463h_snow-queen-gag-sketch-6

In these vignettes dated August 11, 1977, Marc depicts characters on floating ice… including a penguin who reminds us a little of Pablo, the cold-blooded penguin from The Three Caballeros (1945).

Chicken Crêpes Lilly

In the late 1970s, if you happened to be in Central Florida and wanted a truly special meal, there was one place to go: the Empress Lilly. For 18 years, the regally appointed ship beckoned diners with the finest menu at Walt Disney World. Gourmets, park lovers, romantics all agreed: The Lilly—named in honor of Walt’s first lady, Lillian Bounds Disney—was the place to go.
On April 22, 1995, the Empress Lilly’s three famed restaurants served their last meals, and the boat itself eventually became home to a present-day Walt Disney World favorite, Fulton’s Crab Shack. In remembrance of this bygone treasure, we are featuring the most popular luncheon item on the menu, the Chicken Crêpes Lilly.

Chicken Crêpes Lilly

Serves 6

Crêpes
2 eggs
1 cup flour
¾ cup milk
½ cup water
3 tablespoons melted butter
½ teaspoon salt

Sauce Mornay
5 tablespoons unsalted butter
¼ cup plus 2 tablespoons all-purpose flour
4 cups milk, warmed
½ teaspoon coarse salt
¼ teaspoon white pepper
¼ cup grated Parmesan
½ cup heavy cream

Crêpe Filling
1 tablespoon unsalted butter
5 shallots, finely chopped
12 white button or cremini mushrooms
1 pound cooked, diced chicken breast
⅓ cup sherry
Butter, for brushing pan

For Serving
¼ cup grated Parmesan
Sliced almonds, for garnish
Chopped fresh parsley, for garnish

For the crêpes:

  1. Combine eggs, flour, milk, water, butter, and salt in a blender. Blend until smooth, about 10 seconds. Refrigerate batter at least 30 minutes.
  2. Heat a large nonstick pan over medium heat. Brush a bit of butter in pan, and add about 2 tablespoons batter to pan, swirling to form a thin circle. Cook until light golden brown, about 1 to 2 minutes per side.
  3. Place cooked crêpes on a large plate separated by layers of parchment paper. Repeat with remaining batter.

For sauce Mornay:

  1. Melt butter in a large saucepan over medium-high heat. Add flour, stirring until golden. Slowly whisk in milk, making sure there are no lumps. Add salt and white pepper.
  2. Cook, whisking constantly, until sauce is thickened, about 10 minutes.
  3. Pour half of sauce in a medium heat-safe bowl and set aside to cool completely.
  4. Add Parmesan to remaining half of sauce in saucepan and stir to melt cheese. Set aside to cool completely.
  5. Whip cream with an electric mixer until soft peaks form. Fold cooled portion of sauce with cheese into whipped cream and set aside.

For crêpe filling:

  1. Melt butter in a large sauté pan over medium-high heat. Add shallots and cook until translucent, about 3 minutes. Add mushrooms and cook until softened, about 5 minutes. Add chicken and sherry, cooking until chicken is warm.
  2. Lower heat to low and add portion of Sauce Mornay without cheese. Simmer, stirring often, until mixture is thickened slightly.

To serve:

  1. Preheat broiler.
  2. Place about 2 to 3 tablespoons filling in the center of each crêpe, and roll into a cylinder. Place crêpes, seam-side down in a shallow, ovenproof dish.
  3. Spoon the Sauce Mornay with cheese and whipped cream over crêpes. Sprinkle with Parmesan cheese.
  4. Broil crêpes until golden. Garnish with sliced almonds and chopped fresh parsley.

Cook’s Note: White pepper has a slightly floral flavor, and is used primarily to keep the final dish pure white. Black pepper may be substituted.

Make a Frozen Snowflake Wreath

Do you wanna build a snow… flake wreath? Here’s a Christmas door decoration that’s as fluffy as freshly fallen snow, and as sparkly as Anna’s beloved ice-blue dress! Best to use this wreath on an indoor (or fully covered) door.

Supplies:
8.5 x 11-inch white cardstock (printable)
Styrofoam wreath (recommended: 13.8 inches [or 35 cm])
White and blue tulle (recommended: 40-yard roll of 6-inch width for each color)
Winter-colored (blue/silver/white) Christmas bulb ornaments in varying sizes (1 to 1.5-inch diameter)
Snowflake ornaments in varying sizes (from 3 to 5 inches)
Ribbon
Scissors
Hot glue gun

OPTIONAL:
Small string of battery-operated Christmas lights
Exacto knife

  1. Download and print out the Anna and Elsa image (Page 1) onto your cardstock.

2

  1. Using your scissors, cut along the image’s black outline to eliminate most of white border. (Note the small border above the sisters’ inside shoulders; you may need a pair of smaller scissors, or an Exacto knife, to remove that piece.)

3

  1. Cut both the white and the blue tulle into 16-inch strips. We suggest fully cutting up both rolls; you may not end up using every strip (especially if your Styrofoam wreath is a smaller size), but—as you’ll see—the fluffier the wreath is, the better…

4

  1. Take your strips and tie each one around the Styrofoam wreath, with a double knot—alternating two (2) white with two (2) blue—until it’s nice and full (see photo for details).

5

  1. Towards the end of tying your tulle strips, tie a piece of ribbon, around one foot in length, to the wreath (double-knotting it). You’ll use that ribbon to hang your wreath once you’re finished.

OPTIONAL:
At this point, if you have a small string of battery-powered Christmas lights, wrap them around the wreath—through the tulle—and use glue to affix the battery box to the bottom inside of the ring. (If using hot glue, wait for the glue to cool a bit before pushing the box down; you don’t want to melt the plastic! Alternately, use another strong adhesive like super or Gorilla glue.)

  1. Attach the Anna and Elsa printout to the bottom center of the wreath with hot glue (using it to hide the optional Christmas lights battery box). (See photo for details.)

7

  1. Alternate your different-sized snowflake ornaments and attach them with hot glue around circumference of the wreath—leaving Anna and Elsa uncovered, of course! (See photo for details.)

8

  1. Affix your bulb ornaments on top (and in between) the snowflakes with hot glue. (See photo for details.)

9

  1. “Love Is an Open Door”… especially with this wreath displayed on it! Enjoy!

NOTE: Cutting—and any hot gluing—should be done by an adult.