You’re receiving limited access to D23.com. Remember to sign in or join D23 today to enjoy endless Disney magic!
Did you find what you were looking for? Remember to sign in or join D23 today to enjoy endless Disney magic! x
The world premiere of Star Wars: The Force Awakens is shaping up to be the biggest movie event of the year. Beginning at 5:30 p.m. PT (8:30 p.m. ET) today, our friends at StarWars.com will bring exclusive, live-streaming coverage presented by Verizon featuring interviews with the cast and creators of Star Wars: The Force Awakens, live from the red carpet.
Set your hyperspace coordinates now and don’t miss it!
Follow along for live updates from the red carpet on Facebook, Twitter, and Instagram @DisneyD23.
To learn more, visit StarWars.com or watch the livestream below:
The year was 1929. A young Walt Disney is sitting in the bustling lobby of a New York City hotel when a man approached with an intriguing offer. Soon after, the very first licensed Mickey Mouse merchandise item was born: a children’s writing tablet featuring the world-famous mouse. In the years that followed, Christmas would never be the same…
Disney toys have helped Santa Claus bring holiday joy to children around the world for decades. With guidance from our friends at the Walt Disney Archives, we thought the time was right to rediscover some of the most popular toys (and other unique items) of Disney’s past. These images come from catalogues produced by Kay Kamen, Incorporated—a company started by Kansas City ad man Herman “Kay” Kamen, after a fortuitous meeting in 1932 with Walt and Roy Disney, to help provide high-quality Disney merchandise to retail stores around the world. See what kids of yesteryear were putting on their Christmas wish lists!
Cream the butter and sugar in a large mixing bowl until smooth using an electric mixer. Add the eggs and mix until combined.
Sift all the remaining dry ingredients in a separate large mixing bowl and mix well. With the mixer on low, slowly add the dry ingredients to the butter mixture until a dough forms
Remove dough from the bowl and wrap in plastic wrap; place in refrigerator until firm, two to four hours.
Preheat oven to 350 degrees and grease cookie sheets.
Remove dough from refrigerator and allow dough to sit at room temperature for about 15 minutes, until pliable. Divide dough in half and place on floured work surface. Using a rolling pin, roll the dough out until about 1/8 inch thick. While rolling, flour the work surface and rolling pin as needed.
Cut out desired cookie shapes with cookie cutters. Transfer cookies to a greased cookie sheet, placing them 1 inch apart.
Lightly brush cookies with milk and sprinkle with sugar granules as desired.
Bake until firm and edges begin to darken, 10-14 minutes. Allow cookies to cool on the cookie sheet for a minute, then transfer to wire racks to cool completely.
Cook’s notes:
You can find star anise in the ethnic aisle in your local grocery store. To get the best flavor from this spice, you will need to grind the whole star anise pod. For the neatest edges, dip your cookie cutters in flour before cutting out each cookie.
This recipe has been converted from a larger quantity in the restaurant kitchens. The flavor profile may vary from the restaurant’s version. All recipes are the property of Walt Disney Parks and Resorts U.S., Inc., and may not be reproduced without express permission.
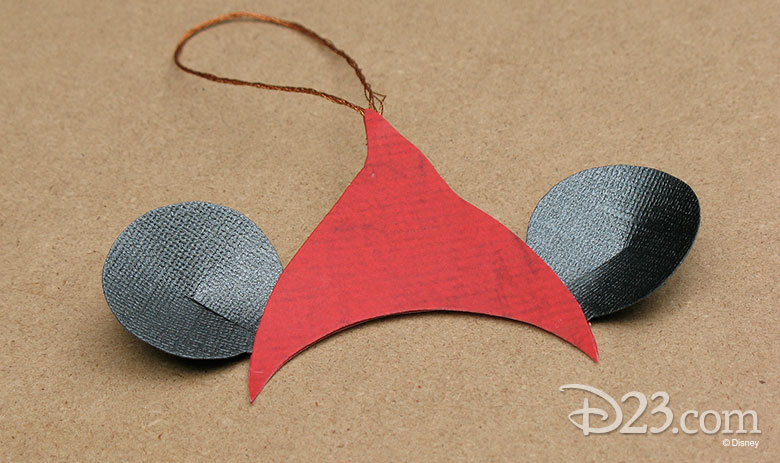
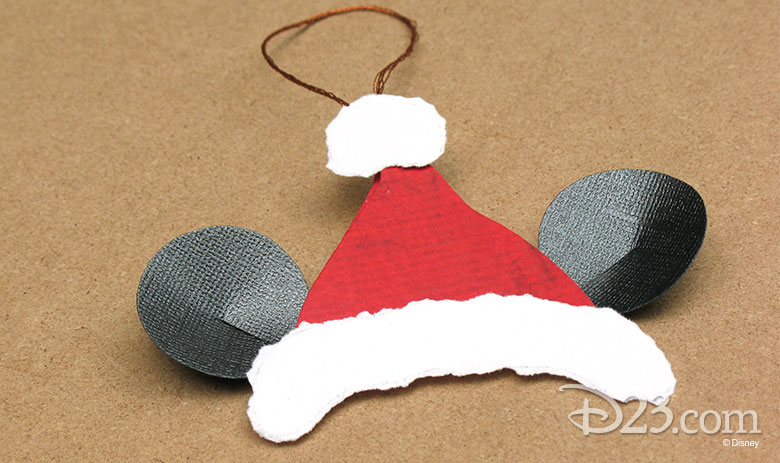
Round out your Christmas ornament collection with this festive paper spin-off of the signature mouse-eared beanie. To help make fashioning this ornament a snap, we whipped up an easy-to-use template for those of you who prefer to forego freestyle hand drawing. Click here to download the template.
When selecting paper for crafting your ornament, consider selecting paper with a subtle-patterned red for the hat and an embossed white for the trim — which will lend texture and dimension to the decoration. And for a sparkly finish, simply add a few brush strokes of glitter glue to reflect the tree lights.
Here’s what you will need:
Scrapbooking paper (red, white, and black)
Scissors
Pencil
Glue stick
Decorative thread, extra-thin cording, or monofilament (for hanging the ornament)
Mod Podge or similar glue sealer and small paintbrush or foam brush (optional)
Glitter glue (optional)
Instructions:
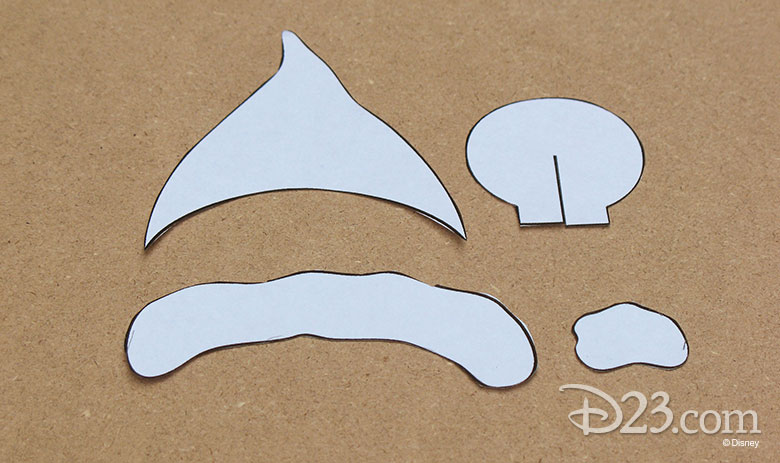
To begin, download and print out the ornament template and cut out the pieces as shown below.
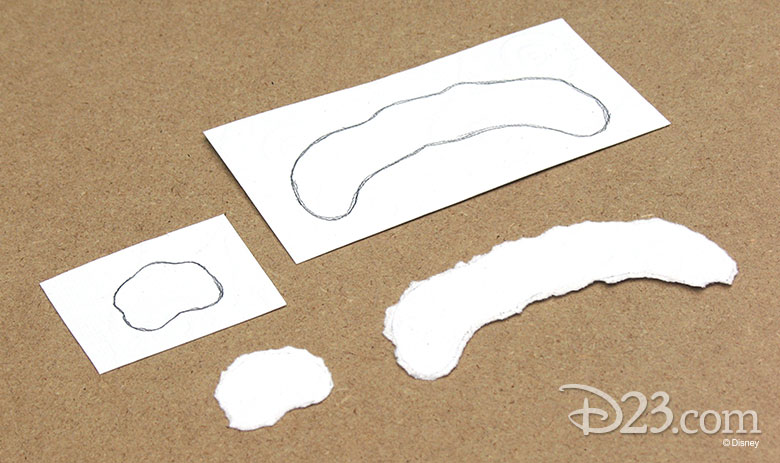
Another option is to draw template pieces freehand on scrap paper as follows:
Santa-style Hat with a concave lower edge (2¾ inches wide at the base and about 3 inches high
Hat Brim Trim (3¼ inches wide by ¾ inch thick and slightly arched to match the lower edge of the hat)
Pompom (1 inch wide by ¾ inch high)
Circular Mickey Ear (1½ inches wide with a ¾-inch-wide by ¼-inch-high rectangular base)
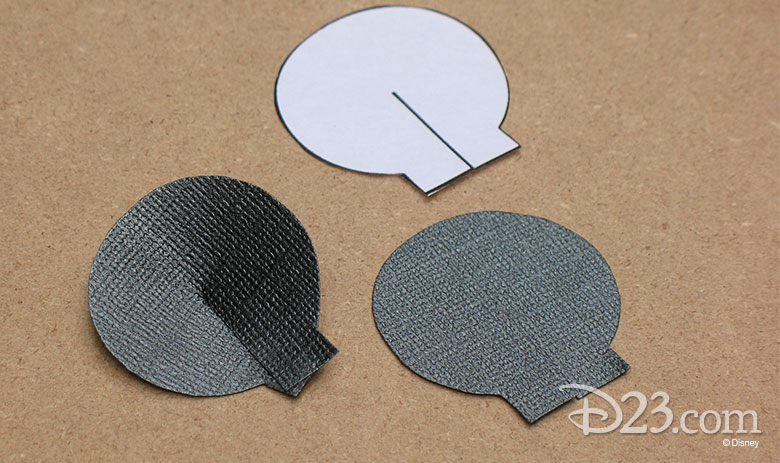
Use the template pieces to cut two hat shapes out of red paper and two ears out of black paper. Keep in mind that you want the hat shapes to mirror each other (since you’ll be gluing them back-to-back). Consequently, if you’re using paper that’s printed on one side only, be sure to flip the template over before tracing it a second time.
Next, trace the hat brim trim twice onto white paper, but do not cut out the tracings. Do the same with the pompom. Now slowly tear the paper along the trace lines to give the trim pieces a feathery edge.
On each ear, snip up through the center of the rectangular base to the middle of the circle. Then overlap the paper on the sides of the slit to create a slight cone shape, and use glue to secure it.
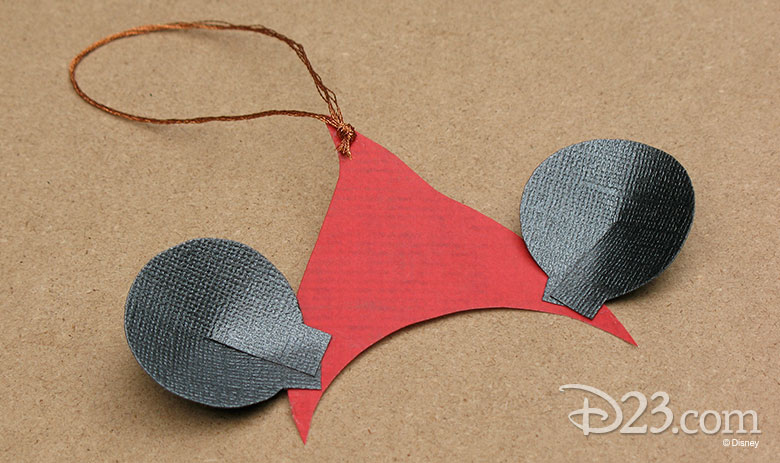
Glue the ear bases to the lower sides of one of the hat shapes. Next, tie a piece of decorative thread into a loop (for hanging the ornament), and glue the knotted end to the tip of the hat.
Glue the second hat shape atop the first, matching up all the edges and sandwiching the ear bases and thread knot between them.
Glue on the brim trim pieces back-to-back, sandwiching the bottom of the hat between them. Likewise, glue the pompom pieces to the tip of the hat.
Seal the ornament by applying a coat of Mod Podge to the front and back. Once the sealer dries (this should take 10 to 15 minutes, depending on such factors as humidity), brush on a bit of glitter glue, if you like.
Watch animator Eric Goldberg—whose hand is behind some truly “animated” stars from the Genie (Aladdin) to Louis the alligator (The Princess and the Frog)—draw favorite Disney characters in an exclusive piece of artwork!
After watching, don’t forget to download your own copy of this piece—created by Eric especially for D23 Days of Christmas.
Make your meals extra special with this mouth-watering recipe from ABC’s The Chew. Similar to beef wellington, this dough-encrusted ham is a great holiday alternative to turkey!
For more recipes and crafts, visit TheChew.com and tune in WEEKDAYS 1e|12c|p on ABC.
Servings: 12 Cooking time: 2+ hours
Ingredients
7-10 pound smoked boneless ham
2 pounds brioche dough
1 cup red pepper jelly
egg wash
Step-by-step Directions
Score the ham by making shallow cuts in a crosshatch pattern. Allow the ham to rest for an hour to come to room temperature.
Preheat oven to 425°F.
Roll out the brioche dough to ¼-inch thick, in the shape of an oval. Spread the red pepper jelly evenly over the dough, leaving a 1-inch border. Place the ham in the middle of the dough and spread more of the jelly on top of the ham. Bring the sides of the dough up to cover the ham completely, pinching the corners together and twisting into a knot. Using the egg wash, brush the edges to seal the dough shut.
Carefully lift the ham onto a baking sheet lined with parchment paper. Brush with the egg wash and place the ham in the oven. Immediately reduce the temperature to 350ºF and let the ham to cook for 2 hours, or until the internal temperature is 160ºF. You may need to tent the ham halfway through. to prevent the crust from becoming too dark.
Remove the ham from the oven and allow to cool for at least 15 minutes. Slice the ham and serve.
Longtime Disney animator Eric Goldberg lent his talents to The Princess and the Frog, Hercules, Fantasia/2000, and The Emperor’s New Groove—but he’s probably best known for bringing the Genie to life in 1992’s Aladdin. Today’s craft is truly special; it’s an exclusive image drawn just for D23 by Eric himself, featuring the Genie and some Disney pals!
Print out and enjoy; you can even use it as a coloring page for the kidlets!
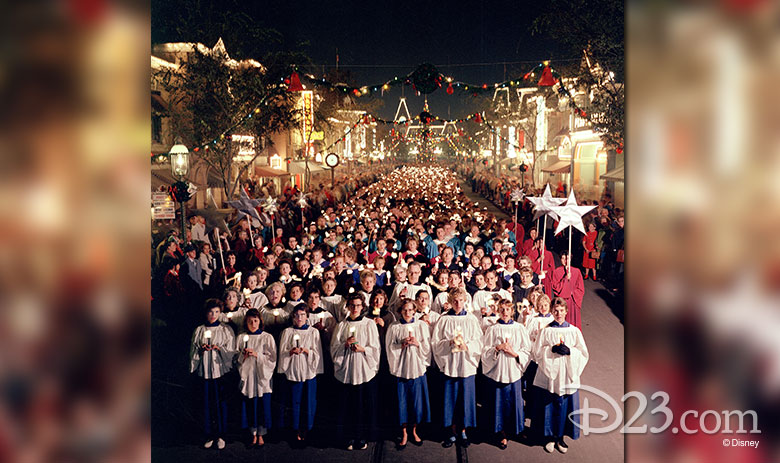
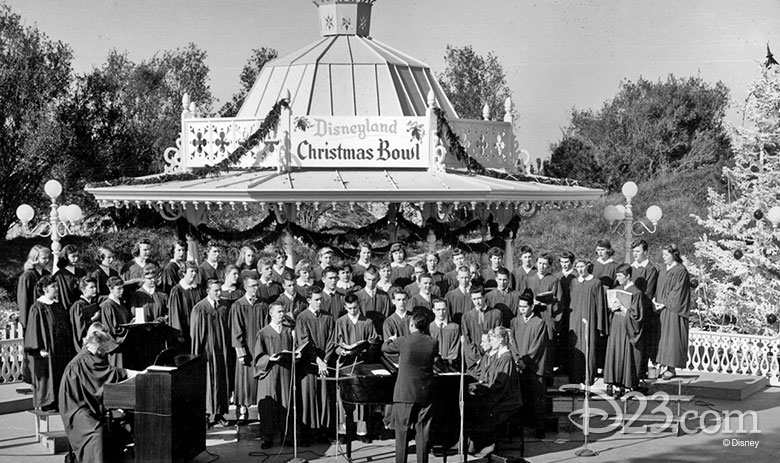
Walt Disney Archives director Becky Cline shares the history of the holiday tradition at Disneyland and Walt Disney World Resort.
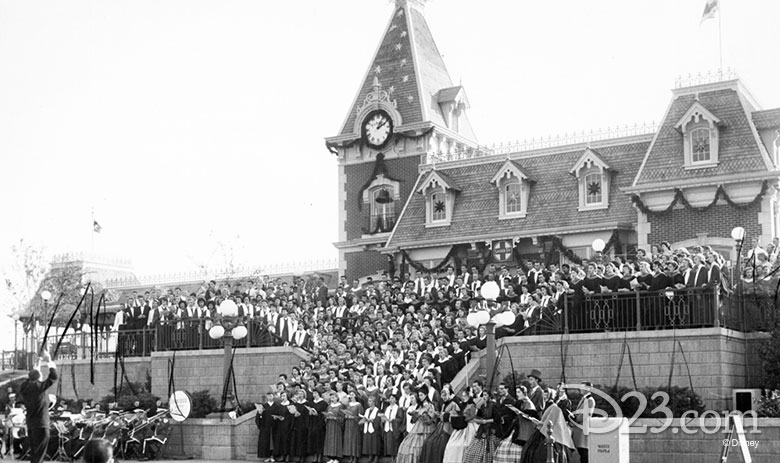
Candlelight Procession at Disneyland Park (1958)
The Candlelight Procession and Ceremony is one of the oldest and most beloved traditions in the 65-year history of Disney theme parks. When Disneyland celebrated its first Holiday Festival in 1955, a group of 12 Dickens carolers, under the direction of Dr. Charles C. Hirt of the University of Southern California, performed throughout the park, and guest choirs were invited to perform daily in the Main Street, U.S.A. bandstand, which was re-christened the “Christmas Bowl” for the season.
The Christmas Bowl at Disneyland Park (1955)
On the opening afternoon of the festival, the carolers and a 300-member massed chorus made up of visiting choirs stood together on the Train Station steps and sang Christmas carols accompanied by visiting school bands.
Massed Choirs perform on Main Street Station on December 15, 1956
The following year, under Dr. Hirt’s direction, the carolers and singers from eight visiting choirs also performed as a group on the station steps, this time accompanied by the Disneyland Band. In 1957, the event grew larger as choirs followed the “Christmas Around the World Parade” processing together from Sleeping Beauty Castle into the Plaza where they were to perform. Unfortunately, due to the size of the crowd, the singers were unable to form a circle in the center of the Plaza as planned. Instead, they stood around the Disneyland band and performed in an informal manner.
The first Candlelight Processional at Disneyland (1958)
The choirs and carolers were so well received by Disneyland guests that in 1958, Dr. Hirt suggested to management that performances by a larger massed choir group would be a welcome addition to future holiday events. Therefore, in December 1958, the first evening Candlelight Processional was held with singers from 16 choirs processing down Main Street to the Plaza where they performed a full concert with the Dickens Carolers singing from the Sleeping Beauty Castle balcony above.
In 1960 the event was moved back to Town Square, and actor Dennis Morgan was invited to read portions of the Biblical Christmas story in between the classical hymns. This tradition has continued with very famous celebrities including Cary Grant, John Wayne, Henry Fonda, Jimmy Stewart, Gregory Peck, Charlton Heston, James Earl Jones, Olympia Dukakis and many others donating their eloquence to the program. The “Living Christmas Tree,” featuring the Western High School A’Capella Choir, was also incorporated into the Candlelight Ceremony that year as a centerpiece for the massed choir ceremony. Western had presented their impressive choral program at the park for the previous two years on a specially constructed “tree” made of risers. It was so well received that they were given this annual place of honor for the next 21 years until their director, Alexander Encheff, retired in 1981. In 1982, the newly formed Disney Employee Choir (volunteer Disney cast members from the Park, Studio and Walt Disney Imagineering) was selected to fill their place, an honor they have held ever since.
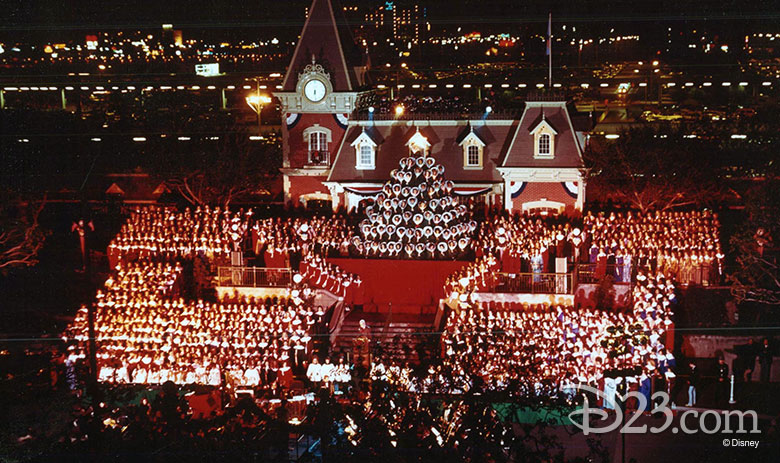
The Candlelight Procession and Ceremony at Disneyland (1976)
Over the years, the event has become so popular that it was also introduced at Walt Disney World’s inaugural holiday season in 1971 (starting at the Magic Kingdom, and moving to Epcot in 1994). It has grown from a simple procession of candle-lit carolers into a magnificent classical concert featuring a thousand voice massed choir, “The Living Christmas Tree”, orchestra, fanfare trumpets, bell choir, soloist, sign-language interpreter, guest conductor, and celebrity narrator. But for all of its grandeur, Disney guests particularly love Candlelight for the way it makes them feel each holiday season.
Actor Howard Keel, who narrated the ceremony at both Disneyland and Walt Disney World in the 1980s, put it best. “I’ve never been a very religious person, but when you stand up there for all of those people with that incredible chorus and orchestra beside you, it’s a wonderfully moving experience.
“In fact,” he added, “I was so moved I could hardly speak.”
This delicious dish can be found at the Paradise Garden Grill for the Viva Navidad celebration at Disney California Adventure Park.
Serves 8 – 10
Ingredients
2 pounds pork shoulder, cut into 1 to 1½-inch cubes
6 garlic cloves, peeled, and split lengthwise
2 bay leaves
1 large yellow onion, diced
1 teaspoon ground cumin
2 tablespoons coarse salt, divided
6 dried Guajillo chiles
2 dried ancho or New Mexico chiles
½ medium sweet onion, cut into large pieces
3 medium or 2 large plum tomatoes, cut in half lengthwise and cored
2 garlic cloves, peeled
1 teaspoon freshly ground black pepper
1 tablespoon Mexican oregano
1 (15-ounce) can white hominy, drained and rinsed
Garnishes
½ small head green cabbage, finely shredded
6 radishes, sliced thinly
3 limes, quartered
1 bunch fresh cilantro, large stems removed, leaves roughly chopped
½ medium onion, finely diced
Instructions
Rinse diced pork under cold water until water runs clear. Transfer pork to a large stock pot over medium-high heat; add 8 cups cold water. Bring to a simmer; skim off and discard foam and solids that float to surface.
Stir in garlic, bay leaves, onion, cumin, and 1 tablespoon salt. Turn heat to medium to keep soup at a light simmer. Cover and simmer 90 minutes (do not boil). Periodically skim foam from surface.
Meanwhile, remove and discard stems, seeds, and large veins from dried chiles. Break into large pieces in a medium saucepan and add 3 cups water. Top with sweet onion, tomatoes, and garlic cloves, keeping chiles submerged. Cover and simmer 10 minutes, then remove from heat and set aside 15 to 20 minutes.
Working in 2 batches, puree chile mixture with cooking liquid in a blender until smooth. Pour mixture through a fine-mesh sieve into soup pot, pressing solids with back of spoon to extract liquid.
Simmer soup for 90 minutes, then stir in black pepper, oregano, and hominy. Taste and season with additional salt, if desired.
Remove a piece of pork and taste for doneness. If meat is not tender, simmer 15 to 20 minutes more.
Serve hot soup with garnishes for topping.
This recipe has been converted from a larger quantity in the restaurant kitchens. The flavor profile may vary from the restaurant’s version. All recipes are the property of Walt Disney Parks and Resorts U.S., Inc., and may not be reproduced without express permission.
What’s more festive than bringing Mickey and Minnie Mouse to your holiday celebration? They might not be able to attend in person—but you can light up your night with these candles inspired by our favorite animated duo… (Note: You can also use red, black, and yellow paper to create these looks.)
Supplies:
Red felt (18 x 12-inch sheet)
Black ribbon (3 yards of ⅞-inch wide)
Yellow ribbon (3 yards of ⅞-inch wide)
8mm round faux pearls
2 small white buttons (1-inch in diameter)
Small bows, 1 yellow and 1 black (approx. 2-inch wide each)
Mason jar candles (recommended: 12-ounce size)
Scissors
Hot glue gun
Permanent marker (i.e., Sharpie)
Ruler
Take your sheet of red felt and wrap it, horizontally, around the candle to measure out desired circumference length (for a 12-ounce mason jar, that’s approximately 10.5 inches). Use your permanent marker and ruler to mark out where you need to cut.
Next, cut two 3-inch-wide strips of felt—enough to wrap around the candle’s outer surface area, just inside the bevels seen at the top and bottom of the jar. (See photo for detail.) And don’t worry: You will end up with some leftover felt once you’re finished with this craft…
FOR THE MICKEY CANDLE:
Apply hot glue to the front of the mason jar candle and place one of your red felt strips around the jar, using hot glue to seal it closed on the back edge. (Keep the side with any marker lines facing in.)
Next, take your black ribbon, measure around the circumference of the candle, and cut to length (again, approximately 10.5 inches).
Do the same for the yellow ribbon.
Align the top edge of the black ribbon (horizontally) to the top of the red felt and hot glue in place—sealing the ends on the back with glue.
Align the bottom edge of the yellow ribbon (horizontally) with the bottom of the red felt and hot glue in place—again sealing the ends on the back with glue.
Center the two white buttons on the lower half of the exposed red felt and hot glue in place. (See photo for details.)
FOR THE MINNIE CANDLE:
Before gluing the 3-inch red felt strip around the second candle, lay it out on your work surface and visually measure out where you want to apply the pearls. (You can use your ruler and marker, if need be.) In our example, we applied five pearls in the first row; six in the second (offset with the top row); and five in the third (matching the top row). Allow to dry.
Then, apply hot glue to the front of the mason jar candle and place the red felt strip around the jar, using hot glue to seal it closed on the back edge. (Keep the side with any marker lines facing in.)
Take your black ribbon, measure around the circumference of the candle, and cut two pieces to length (again, approximately 10.5 inches).
Align the top edge of one black ribbon piece (horizontally) to the top of the red felt and hot glue in place—sealing the ends on the back with glue.
Align the bottom edge of the second black ribbon piece (horizontally) to the bottom of the red felt and hot glue in place—sealing the ends on the back with glue.
FOR BOTH CANDLES:
Finish off the Mickey candle by attaching the small 2-inch black bow to the front of the jar lid with hot glue. (See photo for details.)
Finish the Minnie candle by attaching the small 2-inch yellow bow to the front of the jar lid with hot glue. (See photo for details.)
BONUS TIP:
+ To get extra crafty, create your own small 2-inch bows!
NOTE: Cutting—and any hot gluing—should be done by an adult.