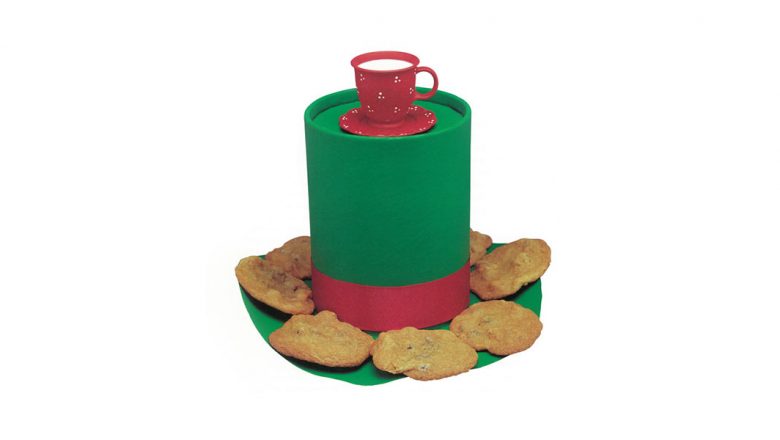
Putting out cookies in advance of Santa Claus’ arrival on Christmas Eve? This wacky cookie tray is just the ticket to bring a little “madness” to Santa’s big night. Make this design your own by either using traditional holiday colors, or any hue that strikes your fancy. (For added Wonderland authenticity, feel free to add the Hatter’s “10/6” price tag.)
Supplies:
Scissors
Drawing compass
Paintbrush
Fabric or craft glue
Cardstock, any light color, about 11-inch by 11-inch
Cylindrical cardboard container, 5½-inch diameter, cut down to 6½-inch height
2-inch-wide ribbon, red (or other color), 18 inches long
Acrylic paint, green (or other color)
- Using the compass, draw a 10-inch-diameter circle on the cardstock. Keeping the point of the compass in the same position on the cardstock, draw a 5½-inch-diameter circle inside the 10-inch circle. Then draw a 4½-inch-diameter circle inside the 5½-inch circle.
- Cut out the 10-inch circle, and then cut the 4½-inch circle out of the center, creating a ring for the hat brim. Make slashes about ½ inch apart all around the inside of the ring, cutting from the inside edge up to the line marking the 5½-inch circle.
- Set the cylindrical container on your worktable with the open end up. Apply glue around the inside of the open end. Put the hat brim on top of the container, and fold the slashed edge down inside the container, pressing the cardstock tabs into the glue. Let the glue dry.
- Paint the outside of the hat and top of the hat brim green (or the color of your choosing). Let the paint dry. Then turn the hat over and paint the underside of the brim. Let the paint dry. If the markings on the cylinder show through the paint, brush on another coat, and let dry.
- Using your hands, roll two opposite sides of the brim towards the top of the hat so the brim curls up a little (as shown in photo).
- Wrap the ribbon around the hat and glue the ribbon ends together.
- When it’s time for Santa to visit your home, place the hat where he’ll be sure to see it! Then place the cookies (or other goodies) around the brim. You can add a small (plastic or paper) cup of milk to the top of the hat, if it’s sturdy enough.
NOTE: Cutting should be done by an adult.


