
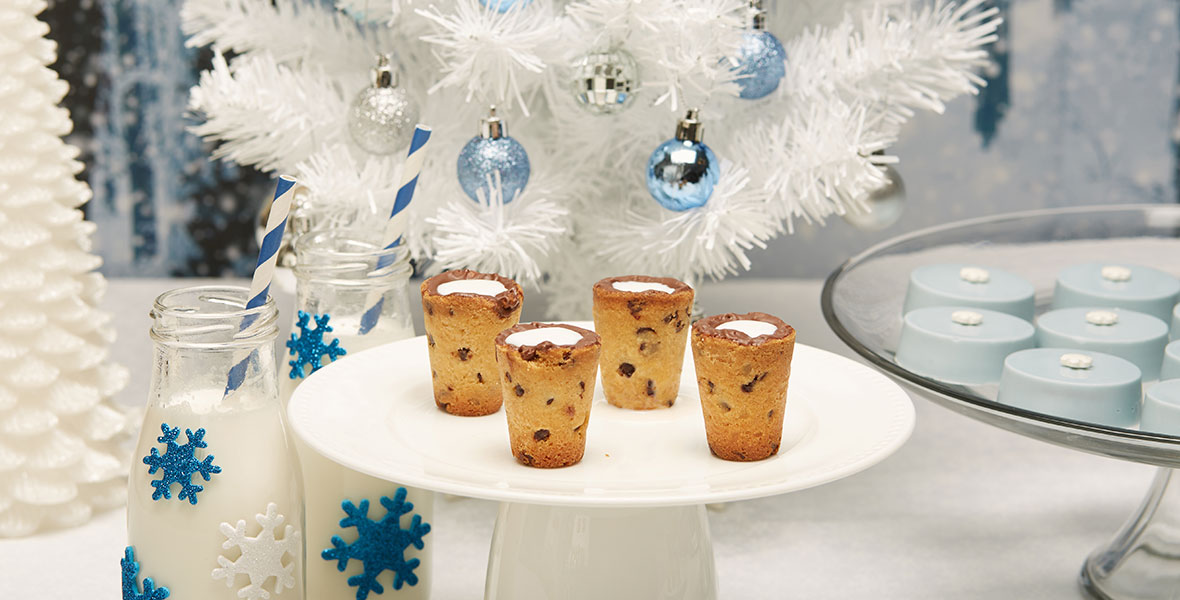
Help Santa get through a long winter’s night with Minnie’s milk-and-cookie mini-cups.
Ingredients
- 2 1/2 cups all-purpose flour
- 1/2 tsp. salt
- 1 cup unsalted butter, softened to room temperature
- 1/3 cup granulated sugar
- 1/2 cup light brown sugar
- 1 large egg yolk
- 2 tsp. pure vanilla extract
- 1 cup semi-sweet mini chocolate chips
- Nonstick cooking spray
- Brown melting chocolate (milk chocolate)
- Milk
Special Materials
- Stainless steel shot glasses
Directions
Prepping the dough:
1. In a medium-sized bowl, whisk the flour and salt together. Set aside.
2. In the bowl of a stand mixer fitted with the paddle attachment, beat the butter and sugars together on medium speed until light and fluffy, about 3 or 4 minutes. Scrape down the sides of the bowl, and add the egg yolk and vanilla extract and mix on low speed to incorporate.
3. Slowly add the flour mixture, mixing until just combined.
4. Remove from mixer and gently mix in the chocolate chips with a spatula.
5. Roll the dough on wax paper to a quarter-inch thick. Place onto a cookie sheet and refrigerate for at least 30 minutes. (Chilling the dough prevents it from spreading while baking.)
Baking the cookies:
6. When you’re ready to bake, preheat the oven to 350°F.
7. Lightly spray the insides of the stainless steel shot glasses with nonstick cooking spray.
8. Remove the dough from the refrigerator and break off a piece, enough to create a shot glass shape inside the shot glass (the serving will vary depending how big the glass is). Press the dough firmly at the bottom and against the walls of the shot glass, making sure it’s tightly packed. Leave a well in the middle big enough to pour the milk in to.
9. Bake shot glasses about 15–20 minutes. Check first to see if they’re ready at 15 minutes; if not, continue baking until the top edge begins to brown.
10. Remove cookies from the oven and let cool completely. Once cooled, turn stainless steel shot glasses upside down to gently ease the mini-cup cookies out.
Coating the mini-cup cookies with chocolate:
11. Place milk chocolate in a microwave-proof container and heat in the microwave 20 seconds at a time until melted.
12. Pour melted chocolate into the insides of each mini-cup, swirling the chocolate to make sure it completely coats the surface. (If not, once milk is poured into the cookie mini-cup, it will start to soften and break down the cookie.) If necessary, use a butter knife to apply chocolate to any uncoated parts.
13. Chill cookie mini-cups in the refrigerator at least 15 minutes, allowing the chocolate to harden and cool.
14. Take cookie mini-cups out of the refrigerator. Fill each one with milk before serving.